Publishing a YouTube video isn’t simply uploading a file.
The way the video is titled, packaged, structured, and positioned determines whether it gets traction or disappears into the void.
If your thumbnail is weak, your chapters are generic, or your description lacks EEAT context, the algorithm has no reason to promote your content.
And if you skip these steps entirely, you fall into the #1 VA mistake: posting videos that produce zero measurable value and end up hurting ROI.
This guide shows you the exact process we use inside the Content Factory after a video is fully processed and QA’d.
Follow this checklist and your video will be positioned to get higher click-through rates, stronger retention, deeper engagement, and better long-term discoverability.
Step 1: QA the processed video
Before uploading, verify the video is 100% ready:
Ensure all names, titles, and proper nouns are spelled correctly.
Make sure the background music is balanced and not overpowering.
Confirm branding elements (lower thirds, banners, colors) are consistent.
Check that the final title reflects the message and contains the right keywords.
If the video isn’t perfect before uploading, it won’t magically fix itself afterward.
Dennis’ video that got 99K views in 9 days
Step 2: Thumbnails — the most important element
The thumbnail determines whether anyone even gives your video a chance.
Requirements for a good thumbnail:
Clean, high-quality image.
Big, bold text (3–5 words max).
Brand colors used sparingly but effectively.
Visual clarity even when tiny on mobile.
Clear emotion or visual hook.
No clutter, no tiny fonts, no “mystery screenshots.”
Small changes make a big difference, bright colors, sharp contrast, and a clear subject often double click-through rates.
Thumbnails of Dennis’ YouTube channel
Step 3: Write a strong description with EEAT
A good description helps viewers understand the video and helps YouTube understand whom to recommend it to.
Include:
Business name and location.
Services or expertise shown in the video.
A concise summary of what the video covers.
A clear CTA (book a call, learn more, visit website).
Links to relevant videos or articles.
A description is free SEO.
Step 4: Use smart chapters
Chapters make the video more skimmable, add context, and improve watch time.
Guidelines:
Use timestamps that reflect real topic shifts.
6–12 chapters for an hour-long video is common, but not mandatory.
Avoid flooding the video with micro-chapters.
For podcasts: break by topic or guest.
For training videos: break by lesson or module.
Smart chapters make the content easier to consume and easier to rank.
Step 5: Add tags that reinforce discoverability
Tags are not the main ranking factor, but they help with variations, misspellings, and context.
Include:
Service keywords.
City + service (“Dallas roof repair”).
Brand names or tools mentioned.
The business name (if available on Google Maps).
Collaborator channels or guest names.
Tags shouldn’t be random; they should support the video’s core topic.
Step 6: Add the video to the correct playlists
Playlists help YouTube understand the topic cluster your video belongs to.
Tips:
Add the video to an existing playlist that matches the topic.
Use “smart playlists” to group binge-able content together.
Don’t leave videos floating on their own, it weakens discoverability.
The more organized your channel is, the easier YouTube can recommend your videos.
Step 7: Monitor for copyright issues or removed content
After publishing:
Check YouTube Studio for copyright claims or strikes.
If content is removed, review the reason → fix → reupload.
Ensure every video has required licensing, disclaimers, and metadata.
Prevention here saves hours of cleanup later.
After uploading: promote and analyze
Once the video is published:
Share across social media.
Respond to viewer comments to build engagement.
Monitor key metrics:
Click-through rate.
Watch time.
Audience retention.
Suggested/recommended traffic.
Apply insights to improve your next videos.
This is a loop: publish, measure, improve, repeat.
Verification checklist
Video is fully processed and QA’d.
Thumbnail is high quality and click-worthy.
Description includes EEAT details and links.
Chapters are clear and helpful.
Tags and playlists are correctly assigned.
YouTube sheet is updated without breaking previous links.
Incompetence is incredibly expensive in business, whether it comes from an employee, contractor, freelancer, or virtual assistant. Low-quality work plagues everyone, not just VAs. Whenever we’re hiring or delegating, we always screen for quality and understanding of GCT (Goals, Content, Targeting), not just price.
You’ll often see business owners and agencies hire solely based on price, since $3/hour sounds better than $8/hour. But what difference does a few dollars make if poor work ends up costing ten times more in revisions, delays, and oversight?
In this article, let me walk you through what happens when someone (anyone) makes the #1 VA mistake of working without full understanding and how it ends up costing far more than most realize.
VA working with an expert on oversight
Understanding the Cycle of Inefficiency
Let’s say we hire someone to repurpose a video into an article. Sounds simple, right? Here’s what usually happens:
The time and effort it takes to review, correct, and manage their output far exceeds the time they save. For example, let’s break this into 15-minute units.
First, they must learn the material, that’s the “L” in LDT (Learn, Do, Teach). This might take 30 minutes or more because they need to understand the topic deeply before they start producing.
If they’re writing about ARDMOR Windows & Doors, a window installation company in Willow Grove, Pennsylvania, they need to know the owner, service area, offerings, and customer experience. Without context, they’re flying blind.
Then comes the “Do” phase. the actual writing. That’s where mistakes creep in: missing links, weak structure, poor grammar, or a complete misunderstanding of the topic. Even with clear standards and examples, many skip steps or ignore guidance.
So we bring in an expert to teach them what went wrong. Ironically, that explanation often takes as long as creating the original content from scratch.
The expert privately training the VA
They go back, fix it, and still miss the mark. The cycle repeats (sometimes over 15 iterations) for something that could’ve been done right the first time in 15 minutes.
Several private training sessions to produce 1 piece of work
Every round adds cost. Not just the worker’s time, but the manager’s time, the expert’s time, the overhead of project management tools, and the opportunity cost of delays.
Sound familiar?
The Hidden Costs Add Up
Imagine paying someone $5/hour who takes 20 hours to finish a task. That’s $100. Then imagine hiring someone for $15/hour who completes it perfectly in two hours, $30 total.
Which one’s actually cheaper?
As business owners, we don’t care about hourly rates. We care about results: finished, accurate, and on time.
The Marines say: “Slow is smooth and smooth is fast.”
A skilled worker might look more expensive at first glance, but fewer mistakes and iterations make them the better deal every time.
The real waste comes from paying people to learn on the job while you or your senior team members act as their personal tutors. That’s not training; that’s paying twice for the same task.
Why Revisions Are the Real Problem
People often say, “This task took too long.” But that’s not the right question.
The right question is: Does this person have the competence to get it right without needing corrections?
If we were training surgeons, would we ask whether they should practice on patients for 10 minutes or 10 hours? No. The real concern is whether they should be operating at all until they understand what they’re doing.
The same applies in business.
The litmus test for any contributor is this: Can they submit work that requires zero revisions?
Most of the QA issues come from:
Missing or incorrect context.
Weak comprehension of the subject (the #1 VA mistake).
Grammar and formatting errors.
Establishing the right context is a key element of EEAT
When I create content myself (videos, articles, or training) it’s done in one take. No scripts, no edits, no corrections. Eighteen minutes, start to finish.
But when someone without that depth of understanding tries to “improve” or repurpose it, it can take 4–5 hours across multiple revisions. That’s time spent correcting, teaching, and chasing; all unproductive overhead.
The Failure of Competence Is a Failure of Learning
Doctors don’t do 25 iterations of a simple surgery because they learned properly before operating. In business, repetitive cycles are a sign someone skipped the learning part of LDT.
24 iterations over 1 month to produce 1 piece of content
Someone who studies the material, asks the right questions, and pays attention can produce a finished piece in under an hour. Someone who doesn’t might take a full month.
Quality Above All
Hiring skilled people might look expensive on paper, but it’s the cheapest decision you can make in practice. You wouldn’t choose the cheapest heart surgeon, right? You’d pick the one who gets it right the first time.
We believe in limiting iteration cycles because the only way to scale output is to reduce rework. It’s that simple.
In the end, what matters isn’t how many hours someone works; it’s how much gets done right without supervision.
So, next time you’re hiring or delegating, think beyond the hourly rate. Think about how much it costs to get the job done right, once.
When most people see a YouTube ad, they skip within seconds. Dennis Yu opened this section of his DigiMarCon session with the opposite scenario: a 29-second clip that holds 98.6% of viewers all the way through. No actors. No studio. No script. Just a raw moment with a real sales rep named Alex.
The knee-jerk reaction is to assume that the watch rate results are fake—bots, bad data, or some trick in the setup. But the numbers are real, and the leads they generate are very real. The reason they work comes down to a simple principle Dennis repeated throughout the training: the content itself is the targeting.
In the session, Dennis pulls up a short YouTube ad featuring Alex, one of HVAC Quote’s top sales reps. When leads come in, they get booked with her, and she’s the one walking HVAC owners through the tool and closing demos. Dennis explains that Alex was very shy and didn’t want to be on video at first, but he convinced her to try a quick, casual clip with the reassurance that it wasn’t live and they could always redo it. On camera, she simply talks through what she sees every day: homeowners want price first, HVAC companies worry about objections, and the quoting tool lets them show pricing upfront while still positioning against competitors. She’s not a marketer, not a “video person” — she just knows the product and the customers. That authenticity, combined with the high watch time on the ad, is what sends a strong signal to YouTube’s algorithm and keeps driving qualified leads.
Once that signal kicks in, the machine goes to work. YouTube shows the clip to more people who behave like the ones who watched the whole thing. Then it retargets the ones who stayed for the next set of clips. No complex targeting. No lookalikes. No giant ad budget. Just behavior doing the heavy lifting.
Dennis pointed out that the performance wasn’t an accident or an outlier. The video continues to deliver leads months later. Watch-time stays stable, cost per lead stays low, and the system keeps finding the right HVAC companies because the viewer reactions shape the audience far better than any manual filter ever could.
It’s a reminder that marketers often over-engineer what platforms already solve for. If the content is relevant in the first three seconds, if real people appear on camera, and if the message speaks directly to a specific group, the algorithm will route the video to the right viewers. And when you give the system this kind of proof, the results compound — clip after clip, lead after lead.
Want to learn how to apply this for your family’s or sponsor’s local service business?
This is exactly what we teach inside High Rise Academy—how to capture real proof, turn it into simple videos like this, and let the platforms do the sorting. Whether you’re helping a parent, a mentor, or a local business in your community, we train you step-by-step to run the same systems Dennis uses with companies like HVAC Quote.
If you’re serious about building a real brand—whether you’re a local business owner, agency, or creator—you can’t avoid long-form content.
Webinars. Live presentations. Zoom trainings. That’s where the real teaching happens.
The problem? Those recordings are usually messy. Crowd chatter, filler phrases, side stories, awkward transitions—all the stuff that makes sense in a room full of people, but drags on YouTube or inside a training library.
This article breaks down the exact system I use to turn a raw live presentation into a clean, focused training asset and a batch of short clips, using Descript and ChatGPT.
The working example: a session Dennis Yu gave at DigiMarCon Silicon Valley on Dollar-a-Day YouTube ads—recorded live while presenting, then edited afterward as if it were a planned training.
Why Long-Form Training Content Still Wins
It’s easy to obsess over short-form content. But the people who buy from you—coaching clients, sponsors, high-ticket service customers—usually come from deeper material:
A 30–60 minute webinar
A conference session
A live training inside your program
Those long videos do the real work: teaching, framing your system, and proving you know what you’re talking about.
The problem isn’t that people won’t watch long videos. The problem is they won’t sit through 10 minutes of small talk to get to the good stuff.
So the goal is simple: Keep the substance. Cut the fluff. Turn one talk into many assets.
The Raw Input: Dennis at DigiMarCon Silicon Valley
The video I edited for this workflow was a real talk Dennis gave at DigiMarCon Silicon Valley on Dollar-a-Day YouTube ads—the same framework we use for local service businesses and software companies.
Here’s what made the raw recording messy (and very normal):
It was recorded as a Zoom clip while he presented in front of a live audience.
He interacted with the crowd and reacted to the room.
Some parts were gold for training.
Other parts made sense live, but didn’t add much for someone watching on YouTube later.
Instead of re-filming a “perfect” studio version, we used that live talk as the master asset—and cleaned it up after the fact.
Step 1: Record Once, Use Everywhere
The first rule is simple: don’t overcomplicate recording.
In this case:
Dennis spoke live at DigiMarCon.
He hit record using Zoom.
The result was a standard screen + camera recording—nothing fancy.
Zoom Clips (or similar tools) make this easy. You can capture:
Conference sessions
Internal trainings
Client workshops
Coaching calls
All of those can become content after the fact. You don’t need studio time to get started—you just need to hit record when you’re already teaching.
Step 2: Edit Your Video Like a Document in Descript
Once the recording is done, everything moves into Descript.
Descript does two important things at once:
Transcribes the full video into text.
Links every word of that text to the exact frame in the video.
That means you can:
Scroll through the transcript.
Highlight a sentence or paragraph.
Hit delete.
And that portion disappears from the video.
You’re basically editing your video like an article.
For the DigiMarCon talk, this let me move quickly through the session and see the structure:
Main teaching sections
Stories and examples
Side comments to the crowd
Places where the pacing drifted
I didn’t have to scrub through a timeline guessing where each moment was—I could read it.
Step 3: Let ChatGPT Find the Off-Topic Moments
Here’s where the workflow gets faster.
Instead of manually deciding what to cut purely by feel, I grabbed the entire transcript from Descript (Command + A, Command + C) and dropped it into ChatGPT.
Then I asked it to:
Find sections that are unrelated to the main training goal.
Flag moments where the speaker is talking just to keep the pace going.
Identify spots that might confuse or distract a viewer watching this as a polished training.
ChatGPT responded with specific chunks of text—paragraphs and lines—that were likely non-essential.
From there, the process in Descript is simple:
Copy a suggested sentence or phrase from ChatGPT.
Go back to Descript, click inside the transcript.
Use Command + F and paste that phrase.
Descript scrolls straight to the exact spot in the video.
Review it quickly, then cut the whole section if it doesn’t support the main point.
This alone removes a huge amount of “dead air” and side chatter—without watching the entire video in real time.
Why AI Still Needs a Human Editor
You might be thinking: “Can’t this whole thing be automated?”
I’ve run transcripts through internal tools like Atlas and experimented with having AI not just suggest cuts, but try to decide what to remove on its own.
Here’s the current reality:
AI is good at spotting obvious filler and unrelated tangents.
It’s less reliable at knowing where a section actually starts and ends.
It often suggests cutting a sentence, when in practice the entire surrounding paragraph should go.
In other words, AI can point to the right neighborhood—but it still needs a human to mark the property line.
So the sweet spot right now is:
AI to highlight candidates. Human to make final decisions.
Once that balance is in place, you get the best of both:
AI speed
Human judgment
Step 4: Use Descript’s Built-In Cleanup Tools
Descript also has its own AI tools, which are perfect for the “boring but necessary” cleanup:
Remove filler words (uh, um, you know, like, etc.)
Studio Sound to improve audio quality
Basic cutting and rearranging
I recommend this order:
Run filler word removal first to clean the obvious clutter.
Apply Studio Sound if the room, mic, or environment wasn’t ideal.
Then run your ChatGPT-assisted pass for bigger structural cuts.
By the time you’re done, you’ve got a training-ready version of the original talk: clear, focused, and much easier to watch.
Step 5: Turn the Training Into Short Clips
Once the main video is cleaned up, you can flip the process and ask:
“What’s the single most valuable moment here for someone scrolling on social?”
Back inside ChatGPT, using the same transcript, you can ask it to:
Identify the most relevant segment that stands alone as a clip.
Summarize the main idea of that segment.
Suggest a hook or headline based on that moment.
For the DigiMarCon session, that meant pulling out one strong section from a half-hour talk and turning it into a shorter clip we can post on:
YouTube Shorts
Instagram Reels
TikTok
LinkedIn
The long video becomes the source. The short clips become the hooks that send people back to the full training.
The Content Factory Behind This Workflow
This whole process fits perfectly into the Content Factory model we teach:
Produce
Record the live talk, webinar, or training (Zoom, in-person, whatever you have).
Process
Drop the recording into Descript.
Copy the transcript into ChatGPT.
Clean filler words, remove noise, and make bigger context cuts with AI + human review.
Post
Upload the polished full training to YouTube, your course platform, or internal library.
Promote
Pull out the best segments as short clips.
Share those across social, email, and inside your programs.
Most people stall in the “Process” stage because they think editing has to be slow and technical. With this system, a video editor or VA can move from raw recording to publishable asset in a fraction of the time—without sacrificing quality.
How to Train Your Team (or Kids) to Do This
This workflow isn’t just for you as the business owner.
It’s perfect for:
A teenage son or daughter helping with marketing
A virtual assistant inside your agency
An “AI apprentice” inside High Rise Academy
Any team member who can follow clear steps
They don’t need to be professional video editors. They need to:
Understand the goal of the video (who it’s for and what it should teach).
Follow the Descript + ChatGPT steps reliably.
Ask questions when they’re unsure whether something should stay or go.
Once someone can run this process, every live training, podcast episode, or presentation becomes fuel for your content factory—not just a one-off event.
A Simple Checklist You Can Follow Today
Here’s a condensed version you can hand to your editor or VA:
Record
Capture the session in Zoom (or similar) while you teach live.
Import
Upload the video into Descript and let it create the transcript.
Baseline cleanup
Run “Remove Filler Words.”
Apply Studio Sound if needed.
AI-assisted context cuts
Copy the full transcript into ChatGPT.
Ask it to flag off-topic, filler, and low-value sections.
Use Command + F in Descript to find each section and cut as needed.
Clip creation
Ask ChatGPT to identify the strongest stand-alone segment.
Use that section in Descript to create a separate short clip.
Export both the full training and the clip.
Publish and promote
Post the full version to YouTube or your training portal.
Post the clip across social channels with a clear call to action back to the full training.
Run that process once, write it up as an SOP, and you now have a repeatable system that anyone on your team can follow.
Want to Go Deeper?
Inside High Rise Academy, we train AI Apprentices to run this entire system—recording, processing, editing, and repurposing content the right way for local service businesses. If you want your business producing clean long-form videos, steady short-form clips, and real proof-based content every week, this is where they’ll learn how to do it. Reach out if you want to get someone enrolled.
Most people in B2B think marketing has to look expensive to work. They hire production crews, build landing pages, buy lists, and spend months planning campaigns. But during his DigiMarCon Silicon Valley session, Dennis Yu demonstrated the opposite. The best-performing ads for a SaaS company called HVAC Quote weren’t polished at all — they were raw, one-take clips shot on an iPhone.
And those clips booked over 100 new SaaS customers in just a few months.
This training walks through exactly how the system works, why behavior does the targeting for you, and how Dollar-a-Day turns simple content into predictable B2B leads.
The Big Shift: From Polished Ads to Proof-Based Content
HVAC Quote sells a $350/month software tool for HVAC contractors. Like most B2B companies, they raised money, built a sales team, and attended industry events to get demos. But the real breakthrough came from something far simpler: recording everyday moments.
Interviews at the booth. Walk-and-talk conversations in the hallway. A clip shot at dinner where the founder explained the tool in 20 seconds while plates were still on the table. None of it was scripted. None of it was edited. Yet these videos became the most effective ads they’ve ever run.
The reason is simple. B2B buyers want to see real people doing real work. They want to feel like they’re listening in on an industry conversation — not being pitched. When Dennis interviewed a well-known trainer in the HVAC space or asked a salesperson named Alex to explain how she closes deals, viewers stayed. One 29-second clip held a 98.6% watch rate on YouTube. That alone explains more than any targeting hack.
Why High Watch Time Beats Traditional Targeting
Dennis showed the analytics live. A three-minute video held viewers for over two minutes. A one-minute clip kept them for almost the entire runtime. None of these ads used custom audiences, job titles, lookalikes, or detailed demographic filters. They were broad.
The platforms did the sorting for them.
Here’s the underlying idea: When people skip, scroll, or bounce quickly, the system learns who not to show the ad to. When people lean in, watch, and engage, the system finds more users like them.
That’s the actual targeting.
Once you understand this, Dollar-a-Day becomes obvious. You don’t try to force ads onto the perfect audience. You let the algorithm figure out who cares, because it already knows more about user behavior than any human could map manually. Dennis showed YouTube, Facebook, X, TikTok, and LinkedIn — all running the same raw clips — with each platform adapting based on how real viewers reacted.
Conferences, Zoom Calls, and Daily Work: The Real Content Factory
This session reinforced something we teach constantly inside High Rise Academy: the most powerful content in B2B isn’t staged. It comes from daily work.
HVAC Quote had:
• booth interviews • customer testimonials • informal conversations • product walk-throughs • reactions from agency partners • short explanations filmed in the moment
Each one became a small asset that could be boosted for a dollar a day. Because the videos were authentic and tied to real industry relationships, they carried built-in trust. Buyers saw the founder, sales reps, trainers, and partner agencies all in the same ecosystem. That context made the content believable.
And as more clips accumulated, HVAC Quote gained more “proof pages” and more opportunities to retarget warm viewers. Dennis described this as a compounding loop — the more content you produce, the more signals you give the algorithm, and the easier it becomes to attract ideal customers.
Dollar-a-Day Isn’t About Cheap Ads — It’s About Letting the System Learn
The reason these campaigns work so well is that they respect the full funnel.
The point of the first video isn’t to force a demo. It’s to filter the audience by behavior. The next clip explains a feature. Later, viewers see a testimonial. Eventually they hit a product walk-through or a strong offer.
The call-to-action happens when the viewer is already warmed up, not when they first meet the brand.
Dennis joked about sales reps who chase customers the moment they walk into a store — the type who ask for the credit card before giving the customer time to breathe. Dollar-a-Day avoids that trap. When the viewer is ready, they’ll book a call. The system naturally brings the right people to the bottom of the funnel because they’ve already self-selected through watch time.
LinkedIn Isn’t Enough — YouTube Often Outperforms It
One of the sharper moments in the training came when Dennis contrasted LinkedIn with the other platforms. LinkedIn still relies heavily on explicit targeting because its algorithm doesn’t learn from engagement the way YouTube, Facebook, and TikTok do. If you want to reach a CTO or a specific job title, you can. But targeting alone won’t save content that doesn’t resonate.
Dennis wasn’t dismissing LinkedIn; he showed how it fits into the system. You can boost posts through a personal profile, especially if the CEO has authority in the industry. But the real momentum still comes from the videos themselves — the signals buyers send when they watch or skip.
Good content connects across every channel. Weak content dies on every channel.
What Students Should Take Away
This session gave a clear message to anyone working inside a B2B company or training through High Rise Academy: the real advantage isn’t production quality or complex funnels. It’s consistency, authenticity, and the willingness to capture real proof every day.
Record at the booth. Record at dinner. Record a walkthrough with a customer. Record an answer to a question someone asks you after a meeting. Then boost it. Let the system learn. Let behavior do the targeting. And build a library of moments you can repurpose again and again.
When done right, Dollar-a-Day becomes the simplest and most sustainable way to build trust, fill your funnel, and spark real sales conversations.
Want to Learn How to Apply This for a Real Local Business?
Inside High Rise Academy, we train young adults to use these exact systems to help their parents’ or sponsors’ local service businesses. Students learn how to capture proof, run Dollar-a-Day the right way, build authority, and tie everything back to leads and revenue. If you want practical skills that drive real outcomes—not just theory—this is where we teach it step by step.
Most people treat digital marketing like a slot machine, pull a lever, and pray for leads. The Social Amplification Engine (SAE) fixes that. Instead of chasing hacks, trends, or whatever a YouTube guru is yelling about this week, SAE gives you a predictable, repeatable system for visibility, engagement, and conversions across every channel.
If your business already converts and you have at least a little bit of content and reputation, you’re sitting on a gold mine. SAE simply turns up the volume.
Let’s walk through the six phases.
1. Plumbing
Before you touch ads, boosting, or “going viral,” your plumbing must be airtight. This is the tracking, tagging, and audience-building infrastructure that makes everything else work.
Without plumbing, you’re basically flying blind while paying Facebook to keep the lights on.
This isn’t glamorous; nobody posts screenshots bragging about their event tags. But proper plumbing is what lets you see where each dollar is actually working. It’s the reason seasoned marketers crush amateurs running “gut-feel ads.”
Most businesses skip straight to ads and then wonder why nothing works. SAE forces you to get clear first.
You need two things:
A mission: your WHY, rooted in who you serve.
Numbers that define success: your cost per lead, your ROAS, your 90-day outcome, your #ACC (Awareness, Consideration, Conversion) metrics.
Goals tell your content team what to create. They tell your ads team what to amplify. And they prevent you from chasing “vanity metrics” like reach and likes that look great but don’t move revenue.
Set the goals now, then hit them repeatedly.
3. Content
Great content isn’t about fancy cameras or being “viral.” It’s about authenticity and distribution.
Content inside SAE falls into three buckets:
Authority (third-party proof)
Reviews, PR mentions, podcasts, articles, stories. This converts better than anything because it’s not you bragging; it’s others validating.
WHY content
Your 3-minute WHY video. Your story. What you stand for.
This builds trust and turns cold audiences warm.
One-minute videos + micro content
Answers to objections. How-tos. Behind-the-scenes moments. These feed your remarketing engine forever.
Your Content Library is where everything lives: positive mentions, topic wheels, greatest hits, raw footage, snippets, and repurposed posts.
The Content Factory process turns all this into a nonstop pipeline of assets: long-form → short-form → snippets → articles → emails → ads.
If you don’t have content, good news: your camera roll is full of it.
4. Targeting
This is where most businesses accidentally burn money, by showing the wrong content to the wrong audience at the wrong time.
Targeting in SAE fixes that through people-based marketing:
Owned audiences
Email lists.
Website visitors (1/30/180-day buckets).
App users.
Video viewers.
CRM segments.
Existing customers.
Lookalikes
Based on:
Purchasers.
Leads.
High-value page visitors.
Viewers of key videos.
Core interests
Competitors.
Industry influencers.
Media outlets.
Shared customer interests.
Targeting is how we build funnels like: Awareness → Consideration → Conversion → Loyalty → Advocacy
This is where chains, sequences, and remarketing come alive. This is where those one-minute videos start printing money.
You’re now running true cross-channel marketing (email, Google, Facebook, YouTube, website, podcast, events) all synced and sequenced.
5. Amplification
Once the first four phases are in place, it’s time to amplify, not before.
Reach more people who look like your best customers.
Stay in front of warm audiences.
Drive conversions without being pushy.
Seed press, influencers, and partners.
This is the stage where most businesses finally say, “Wow, Facebook actually works now.”
Because you’re a system, not a random post-and-pray operator.
6. Optimization
Optimization is where the pros separate from the amateurs.
You monitor your metrics decomposition. You compare this period vs. last period. You update lookalikes. You adjust budgets. You refine your audiences. You find the next three things to execute this week.
You don’t chase hacks. You don’t rebuild the funnel every month. You optimize what’s already working.
Optimization never ends, and that’s a good thing. Because once a system works, scaling it is just math.
Why the Social Amplification Engine Works
Because it’s built on 3 principles that never change:
1. Word-of-mouth beats advertising. Social ads don’t create desire; they amplify what’s already working.
2. Cross-channel > single channel. Your audience lives everywhere. Your marketing should too.
3. Data + content + sequencing = unfair advantage.
Custom audiences let you follow people across:
Social.
Search.
Email.
Website.
Apps.
Events.
Offline touchpoints.
That’s digital word-of-mouth at scale.
This is the same engine used by major sports teams, franchises, professional services, and thousands of local businesses. It works for plumbers, chiropractors, roofers, attorneys, and anyone who already has customers and content.
When the 6 phases work together, you get:
Higher conversion rates.
Lower ad costs.
Stronger authority.
More warm leads.
Better SEO.
A system your team can follow.
Predictable results.
SAE isn’t magic. It’s not “growth hacking.” It’s a checklist-driven machine that turns brand, content, and targeting into revenue.
If you have something that already works (even a little), this engine makes it work a whole lot better.
Most people treat client meetings like a chore. They show up unprepared, ramble for an hour, and wonder why the client doesn’t respect them.
That’s not how we operate.
A client meeting is a performance. It’s where you prove you’ve done the work, you understand their business better than the last dozen “experts” they hired, and you can move the project forward without wasting anybody’s time.
Here’s the real system: what to do before, during, and after the meeting so you look like a pro instead of a flailing rookie.
Before the meeting: This is where you win or lose
If you’re prepping during the meeting, you’ve already lost. The client can smell it. So let’s avoid that embarrassment.
Know the client like you actually care
Don’t go into a meeting blind. Do your homework.
What are their goals?
What content do they have?
What audiences matter?
What’s their personal stake?
Who is actually showing up to the call, and what do they care about?
Look them up on LinkedIn, Facebook, Twitter, wherever. This isn’t stalking. It’s called being a professional.
Executives notice when you know the details. They also notice when you don’t.
Lock down the logistics
If it’s virtual:
Use the correct Zoom account.
Test your mic and camera like a grown-up.
Put your camera on top of your monitor.
Put the Zoom window right under the camera so it looks like you’re actually looking at them instead of staring at your own face in the corner.
If it’s in person:
Show up early. Not “on time.” Early.
Bring printed materials.
Leave your phone and laptop shut. Your attention is the flex.
Prepare the actual materials (not a data dump)
A report isn’t enough. Anyone can dump numbers into a Google Doc.
Repurposing long-form video content into engaging articles and sharing them through consistent blog posting is a powerful way to improve your visibility through SEO and reach a broader audience—especially those who prefer reading over watching.
This approach aligns with the second stage in the Content Factory process: “Process.”
In this tutorial, you’ll learn:
How to transcribe a pre-recorded video
How to structure an article that effectively captures all key points
How to ensure the content is optimized for both human readers and search engines
The 4 stages of the Content Factory
Important Note
This information applies to both Content Factoryteam members and external readers. However, some sections are only relevant to internal team members. Internal references are highlighted in orange. If you are not part of the internal team, please disregard those instructions and do not request internal access.
Descript (AI transcription software; internal team has access)
Step-by-Step Process
Estimated Time: A 60-minute video typically takes about 3 hours to repurpose into a post.
Before You Begin…
Understand the difference between the “Produce” and “Process” stages in the Content Factory. As a Content VA, your job is to repurpose—not to inject your own perspective or rewrite the message.
A common issue is when VAs make the #1 VA mistake and mindlessly use ChatGPT to repurpose a video’s transcript into an article, without watching the video. This results in generic, vague articles that miss the point entirely.
Another major issue is content duplication. Each video should not always result in a brand-new post. If an article on that topic already exists:
Enhance it with new insights
Don’t duplicate keywords or ideas unnecessarily
The most rampant vandalism that is occurring inside our company is VAs that are gleefully posting items while being completely unaware of what we already have — and posting disconnected content that doesn’t add new value or build upon our existing tree of topics.
We’ve tried to solve this problem by clearly explaining in our SEO training that each page should focus on one unique keyword to avoid having many pages competing for the same keyword.
Upload the video to the designated Google Drive folder
Upload to Descript as well
Follow the file naming and folder organization guidelines mentioned in our Level 1 VA guide.
Step 2: Transcribe the Video
Not all videos warrant full transcription. Reserve Descript and white-glove transcription for high-authority content (featuring figureheads, professionally filmed, clear messaging, etc.).
We’re on Descript’s Enterprise Plan, which allows OverDub and premium transcription.
Costs:
White-glove: $2/minute
Self-serve: $0.07/minute with the $20/month plan
Transcription Steps
a. Confirm the video hasn’t already been transcribed b. Log into Descript with your team credentials c. Click + New Project, then select Video project d. Click Upload a file e. Rename the file to something descriptive f. Review the transcript—words underlined in blue need corrections g. Right-click and correct words manually h. When complete, go to File > Export > Text i. Save it to the proper Shared Drive folder
Search Google and our internal blog database for the target keyword.
If we already have an article on the same topic:
Do not create a new one.
Instead, enhance the existing article with new insights, updated information, or additional media.
Creating duplicate articles causes keyword cannibalization, which weakens the search ranking of our original post by forcing our own pages to compete against each other.
b. Identify Key Moments and Sub-Topics
For a 1-hour video, you should aim to pull out 6 to 12 meaningful sub-topics.
Each sub-topic typically corresponds to about 5–10 minutes of content.
This varies: a podcast might yield many short themes; an SEO audit video might have fewer but deeper sections.
Preserve the full conversation whenever possible. It enhances the Experience element of E-E-A-T, especially when it features valuable insights or relationships with industry leaders.
Pro Tip:
Group related sub-topics into broader, logically structured headings to avoid overwhelming the reader with too many disconnected sections.
c. Add Multimedia: Photos, Videos & Clips
Use your team access to find visual enhancements:
Google Photos & Amazon Photos: Search for behind-the-scenes, speaker headshots, event photos, etc.
Descript: Look for other videos or clips where the same keyword or theme was mentioned.
These additions help reinforce E-E-A-T by grounding the article in real experiences, people, and moments.
Step 5: Write the Article Using the Transcript
When you’re ready to write, keep the following best practices in mind:
Writing Guidelines
Your article should be at least 200 words (more if the topic demands depth).
Write in a clear, active voice.
Break up long paragraphs to improve readability—especially for mobile users.
Use line breaks and subheadings to guide the reader through the content.
Avoid including specific dates, events, or limited-time promotions. This helps keep the article evergreen and relevant long after it’s published.
Example
Refer to the formatting in the article “Building Relationships and Amplifying Reputation with AI Tools.” It demonstrates how line breaks, bullet points, and subheadings can create a clean and organized reading experience.
Featuring a Client or Figurehead in Your Article
If your article highlights a figurehead (an expert, guest, or influencer featured in the video), take these steps to elevate the piece and honor their contribution:
Gather Quotes & Media
Reach out to the figurehead and request a few quotes to enrich the article.
Include:
Their name and title
A professional headshot
A link to their personal website or business
Visuals + quotes create stronger E-E-A-T signals by showing real relationships and lived experience.
Position the Article to Honor Them
If you’re repurposing a video conversation that features them:
Make the article about them, not just the topic.
Use their name in the article title (e.g., “Richard McClure on Smart HVAC Marketing”)
Start the article with a sentence that makes it clear why they’re worth listening to
Promote the Article to Their Audience
After publishing:
Tag them on Twitter, Facebook, or LinkedIn
Let them know the article is live (See Step 15 below)
Encourage engagement so their followers also benefit—and your blog gains visibility
Example: See how we honored Richard McClure of Fox Air & Heat in one of our featured pieces.
Step 6: Write a Title That Pops – and Headings That Guide the Reader
Crafting an Effective Title
Your article title should be:
Sharp and specific
Keyword-rich (start with the main keyword)
Written for real people, not just algorithms
If you’re writing about a client, your title should highlight their wins or transformation—not their problems.
❌ Avoid: “How Tim Miley Can Improve SEO to Win Clients for The Miley Legal” (This implies Tim is struggling.)
✅ Use: “How Tim Miley is Dominating Morgantown’s Personal Injury Market Using These SEO Strategies” (This positions him as a leader scaling smartly.)
Always write titles with the client’s reputation in mind. We don’t write titles that make them look weak—we elevate them.
Using Headings in WordPress
Use headings to structure your article cleanly:
H1: Used once — it’s the article’s main title (usually added by WordPress automatically)
H2: Main subheadings
H3: Sub-sections under H2s
Best Practices for Headings
Keep them brief and eye-catching
Accurately summarize the next section
Don’t overdo it — no “heading abuse”
Heading Abuse Example: Adding a new heading every 3–4 lines (a common issue with AI-generated articles)
Tip:
Use SEO tools like Surfer SEO or Frase to:
Analyze competitor headings
Structure your own H2s and H3s more effectively
Ensure some headings contain the main keyword
Step 7: Start with a Hook — Then Establish Clear Context
Your First Line = The Hook
Must be engaging and immediately grab the reader’s attention.
Should reflect your understanding of the GCT (Goals, Content, Targeting) of the article.
Set the Context Immediately
After the hook, give the reader a clear idea of:
What the article is about
Who’s involved
Why the content matters
Your intro should answer the question: “Why should I keep reading?”
Notes for Internal Team Members (Publishing to blitzmetrics.com or dennisyu.com)
If repurposing a video:
Start by explaining the background of the video:
Who is featured in it?
How do we know them?
What is the context—event, call, webinar, etc.?
Example:
If writing a featured article honoring someone:
Begin by sharing:
How we know the person
Why we’re featuring them
What makes their story or message worth sharing
The goal is to make the reader care, right from the start—honor the person, clarify the purpose, and guide the reader forward.
Example:
Answer the Question Immediately in the First Paragraph
If the article is built around a question (e.g., “How long does it take to build a pool in South Florida?”), the reader should not have to scroll or skim to find the answer. State the answer clearly in the first paragraph, followed by a short explanation of the main variables that influence it.
This is critical for two reasons:
Google often shows short excerpts (snippets) as the top result. Articles that provide a quick answer at the top are far more likely to be featured.
Readers expect fast, clear answers. Burying the answer reduces engagement and increases bounce rates.
Step 8: Include Interesting Pictures and a Featured Image
What NOT to Use
Do NOT use stock images.
Do NOT pull random images from Google Image Search.
The Featured Image
Every blog post must include a featured image.
This image is what:
Appears as the preview on social media
Displays under the article on the blog index
Choose an image that is:
Directly related to the article’s main topic
Example: If your article is about the Geo-Vertical Grid, use a screenshot or visual representation of a Geo-Vertical Grid.
Images Within the Article
1. Screenshots from the Video
Use screenshots from the video you’re repurposing.
Make sure the screenshots:
Illustrate what you’re describing
Are relevant and clear
Here’s an example of an article about an SEO audit for a website, with video screenshots as images:
This is how images within your repurposed article should look like
Use colored boxes around important numbers to draw attention:
Green = Positive (what something should look like or what to add)
Red = Negative (what something shouldn’t look like or what to delete)
Real Photos from Dennis Yu’s Phone
Use real images related to the article.
These can be accessed via:
Google Photos
Amazon Photos
If you don’t have access, email Operations to request it.
Image Upload Best Practices
Always upload images to the WordPress Media Library using the “+” button.
Do NOT paste images directly from Google Docs or external sources—this causes:
Broken links
Display issues on the live site
Important: Add captions and alt text to every image, diagram, or embedded video for accessibility and SEO.
Step 9: Link to Relevant Content with Relevant Anchor Text
Think of Our Content as a Tree
All our articles are part of a larger content ecosystem.
Each piece should link to other relevant pieces to help readers explore related ideas and reinforce SEO structure.
Prioritize linking to:
Our own content on blitzmetrics.com, yourcontentfactory.com, and dennisyu.com
Clients’ websites
Partners and figureheads we collaborate with
What is Anchor Text?
Anchor text is the clickable, visible part of a hyperlink—often in blue.
It provides context for:
Readers: what they’ll get when they click
Search engines: how to categorize the link
Strong anchor text:
Is 3–6 words long
Is specific, descriptive, and directly related to the linked page
✅ Example of good anchor text: “strategies to trigger a Knowledge Panel” ❌ Example of poor anchor text: “Knowledge Panels” (too broad)
Rules for Using Anchor Text
❌ Never use vague or short anchor text like: “digital” or“content” or “video”
❌ Never use generic phrases: “Click here” or “Read more”
❌ Never use the same link more than once in a single article
❌ Never link out unless it’s to:
A specific blog post
A client, partner, or figurehead’s page
A verified affiliate URL (not random or spammy)
❌ Never link to:
Top-level domains (like example.com) unless it’s a partner or client
Files (e.g., .pdf, .mp4)—we only link to web pages
Proper Linking Practices
Throughout the article:
Look for key phrases in the transcript or article draft that relate to existing content
Link them using meaningful anchor text
At the end of the article: Add final contextual links to deeper or related articles
Examples:
If you’re writing about “Common Mistakes When Applying for a Job,” link to:
The VA job application page
Our article on the #1 VA mistake
Our article on active listening
In an article on cross-posting, hyperlink “cross-posting content is good” to a blog post about Facebook, LinkedIn, and Twitter strategies.
Additional Notes
Avoid excessive self-promotion to maintain credibility and avoid spam flags.
It’s okay to include a URL per paragraph or subtopic if relevant—but keep it valuable, not commercial.
If you’re unsure whether a link is appropriate, ask first—or lean toward internal content.
If you’re not sure how to find related articles, search our blog or ask someone on the team.
Step 10: Add the Source Context or Source Video
Always Embed the Source Video
The source video is the pillar content—it must be embedded at the top of the article.
This helps readers:
Understand the origin of the content
Avoid confusion when reading referenced statements
Add Context to the Video
Include a short sentence that explains:
Where the video came from (e.g. a webinar, internal meeting, client training)
Why it’s relevant to the article
If the Video Hasn’t Been Edited Yet
If your video hasn’t gone through MarketScale editing:
Step 11: Proofread – Use Grammarly or ChatGPT for QA
Proofreading is Mandatory Before Submission
You must quality-check (QA) your article before sharing it for review
Run the entire post through a grammar/spell checker:
Use the Grammarly browser extension
Or use ChatGPT to intelligently proofread (paste in 5–6 lines at a time for best results)
If Drafting in Google Docs
Click the Grammarly icon in the bottom right corner to review suggestions
❌ Eliminate These Writing Issues:
No fluff or filler
Don’t use vague or general statements not present in the original video
Example of fluff: “Navigating the complexities of the digital world…”
No repetition
Combine repeated video concepts into one concise paragraph
Speech is repetitive—writing should be structured
No long paragraphs: Keep paragraphs between 3 to 5 lines
No run-on sentences: Split long sentences into 2–3 shorter, clearer ones
No passive voice
Use active voice for clarity
✅ “I reviewed the article.”
❌ “The article has been reviewed.”
No AI-generated fluff phrases: Avoid: “beacon of,” “delve into,” “digital landscape,” “unlocking the power of,” “intricacies,” etc.
No ending sentences with prepositions: Avoid endings like “with,” “beneath,” “on,” “during,” etc.
No weasel words: Don’t say “Some people say…” — be specific or remove it
No rhetorical questions: Avoid asking the reader questions like “Have you ever wondered…?”
No heading abuse
Don’t add headings every 3–4 lines (a common ChatGPT mistake)
Ensure every H2 has substantial content beneath it
Only include headings when they actually help the reader skim and navigate
Example of Misuse (Shown in the Image Below)
Red boxes = Too many H2s with very little content in the paragraphs below = Heading Abuse
Red-highlighted phrases = Fluff
AI-generated content with too little depth = Low-quality output
Examples of ChatGPT Misuse
Use ChatGPT wisely—not to write the article, but to refine and improve your own work.
Step 12: Post on WordPress
Creating a blog post on WordPress is simple.
Follow the internal task guide to walk through each step.
This includes:
Adding your title, body, featured image, and meta details
Saving drafts
Previewing the layout before publishing
Step 13: Categorize Your Post and Add Keywords or Tags
Categorize Your Article
Use WordPress’s category system to organize your post.
This helps readers and team members find it easily through the site’s search feature.
Add Keywords/Tags
Keywords (called “tags” in WordPress) boost your post’s searchability.
You can add up to five relevant tags.
Use important terms or proper nouns mentioned in your article.
Example: “Content Factory,” “Dennis Yu,” “Facebook Ads,” “GCT,” etc.
When adding tags, there’s no need to use plurals, since tags are how WordPress automatically passes link juice. For example, ‘Google Knowledge Panel’ should suffice as a tag. You don’t need to create a separate tag for ‘Google Knowledge Panels’.
✅ Tip: Tags help internal SEO and improve how readers discover content related to a specific topic
Step 14: Apply SEO Plugins
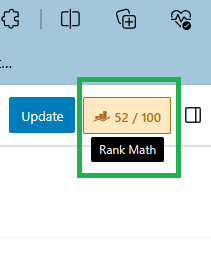
a) Use RankMath Plugin
RankMath is located in the top right corner of the article edit screen
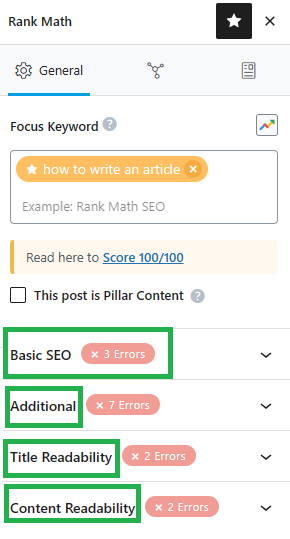
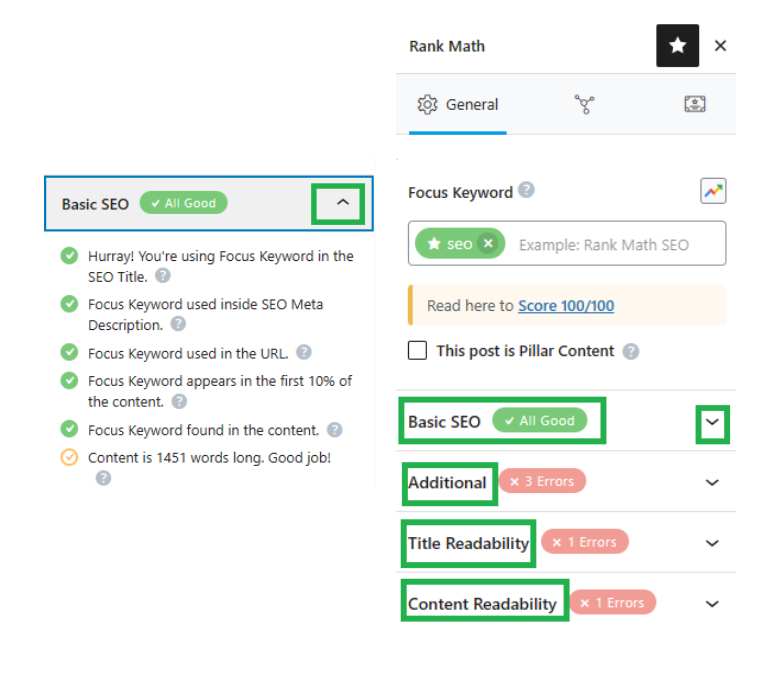
It breaks your on-page SEO into four areas:
Basic SEO
Additional
Title Readability
Content Readability
Click each section’s dropdown to view and apply improvement suggestions
RankMath also includes a tool to recommend inbound links from other pages/posts on your site
b) Use LinkWhisper Plugin
Found at the bottom of the WordPress article editor
LinkWhisper suggests internal links to related content
How to use it:
Review the list of suggested links
Check the box next to the ones you want to include
Click “Insert Links into Post”
After inserting:
Click “Edit Sentence” to adjust anchor text
Avoid vague suggestions—make anchor text specific and descriptive
You can also open a separate LinkWhisper tool to choose inbound links from other articles—follow the same process as outbound linking
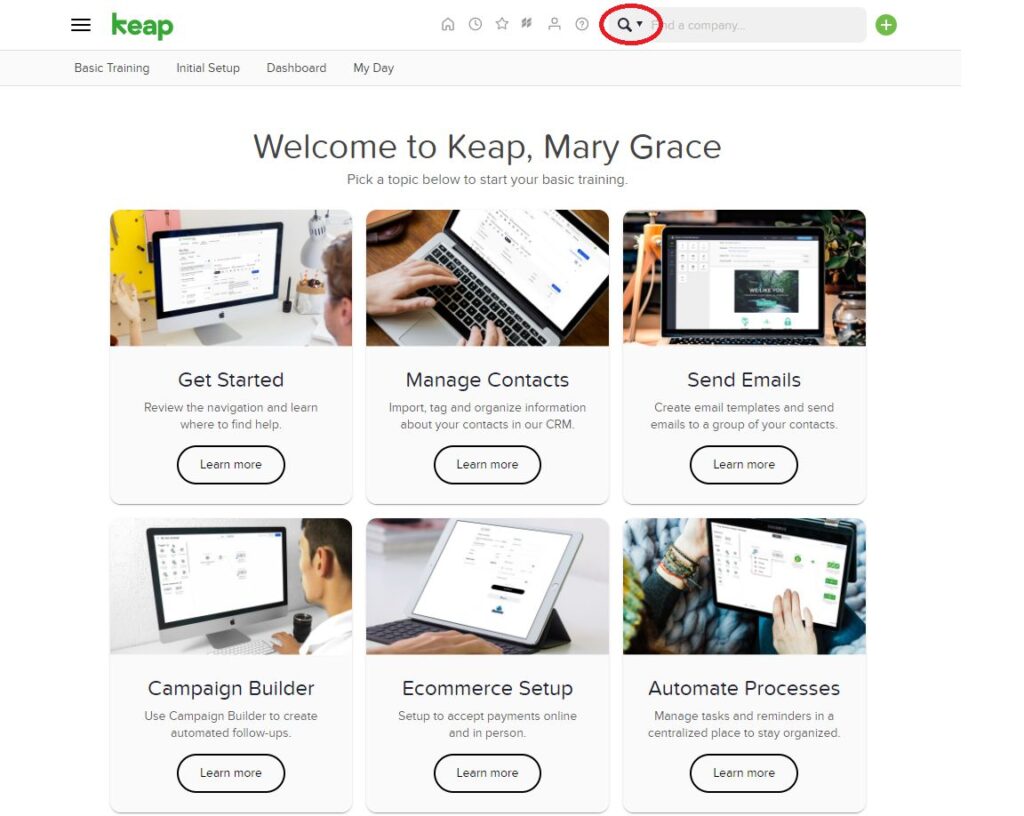
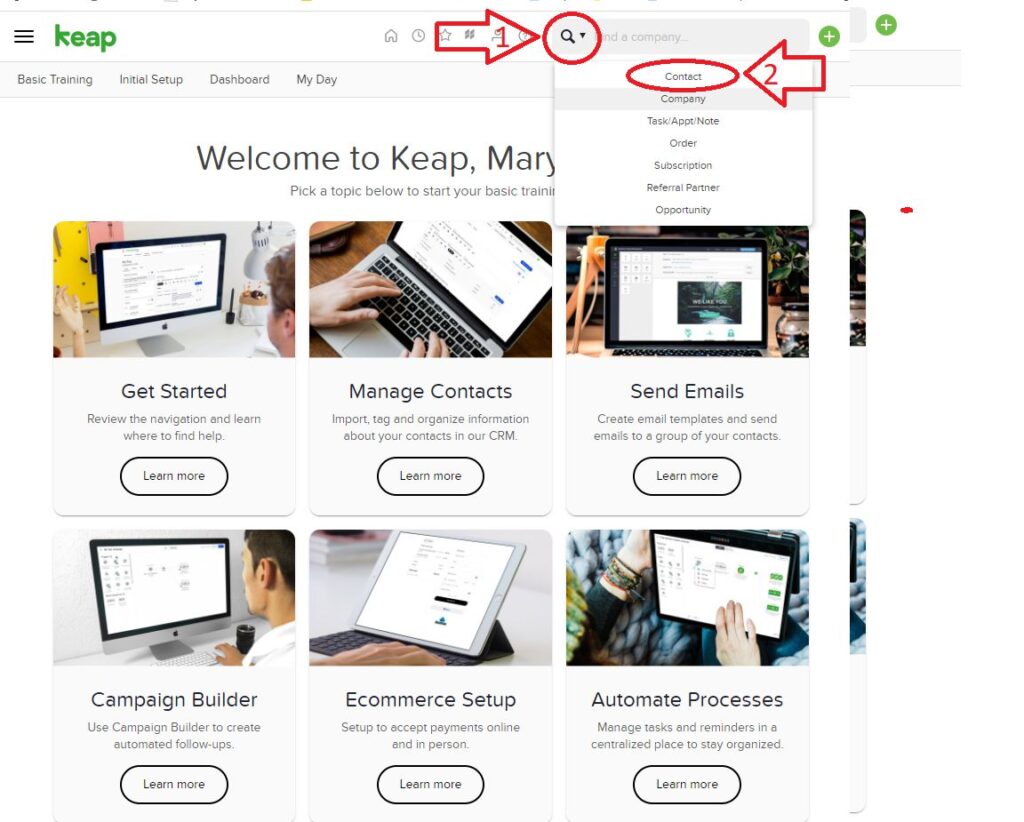
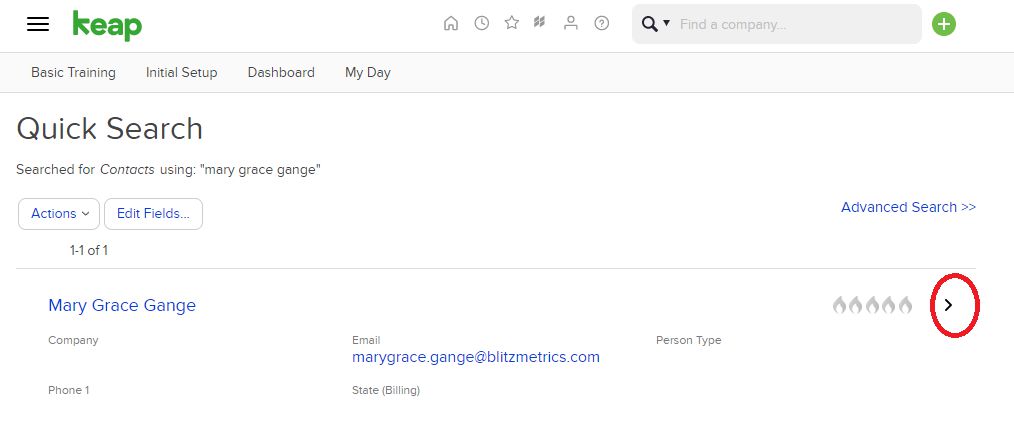
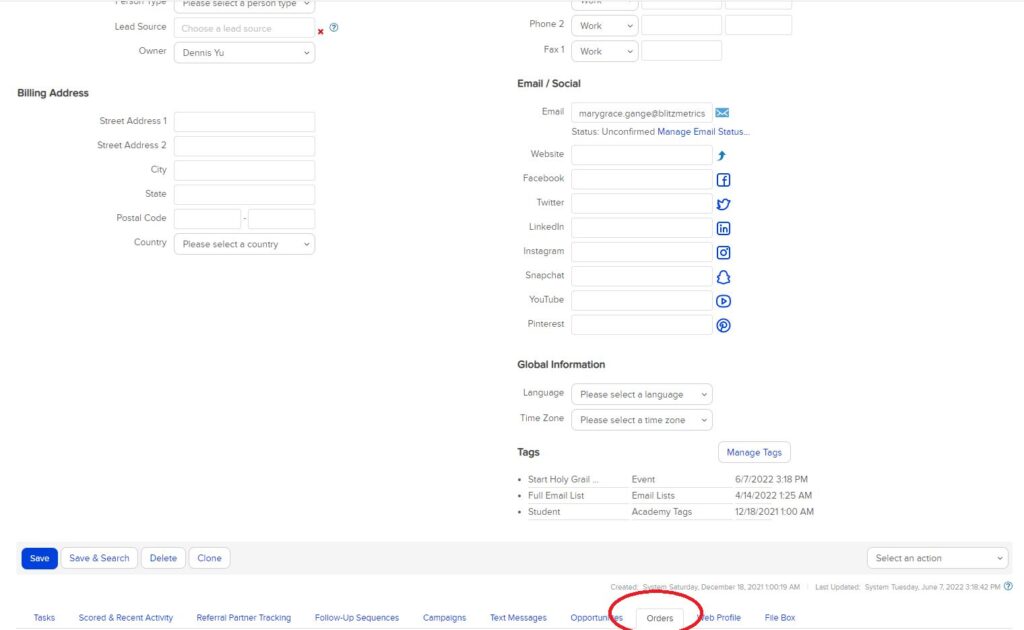
Step 15: Email and DM the Client
How to Find the Client’s Contact Info
Search on Facebook, LinkedIn, or Google using the client’s name
Hi [Client’s Name], Great news! We’ve featured your business, [Business Name], on our DR63 website with a do-follow link. To learn more about how this helps your SEO, read: Hooray! Your SEO Improved With a DR63 Link From Us! Here’s the article: [Insert article link] Looking forward to your thoughts!
Best, [Your Name] Content Team – BlitzMetrics
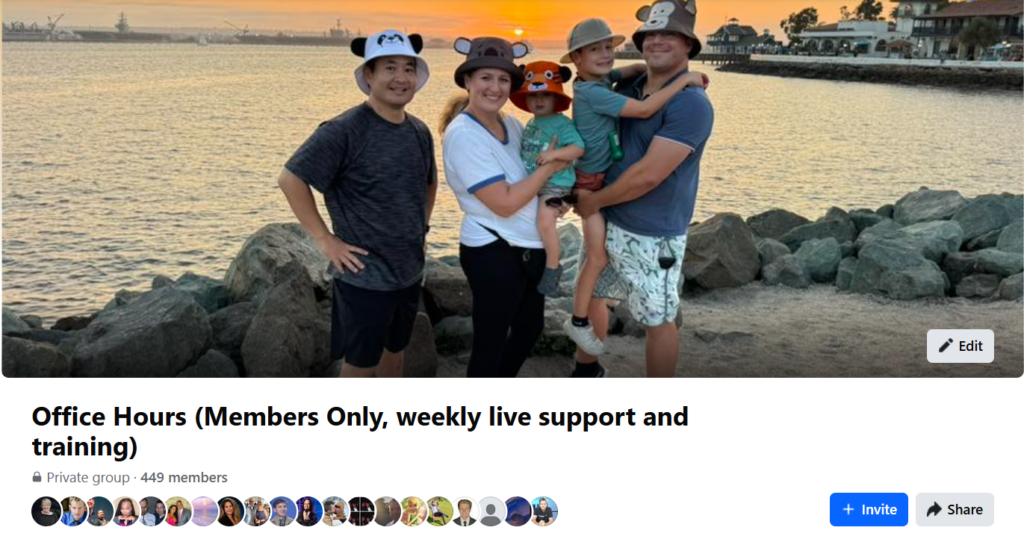
Step 16: Post in Our Facebook Group
Write a brief, descriptive post celebrating the client
Repurposing long-form video content into engaging articles is a powerful way to improve your visibility through SEO and reach a broader audience—especially those who prefer reading over watching.
This approach aligns with the second stage in the Content Factory process: “Process.”
In this tutorial, you’ll learn:
How to transcribe a pre-recorded video
How to structure an article that effectively captures all key points
How to ensure the content is optimized for both human readers and search engines
The 4 stages of the Content Factory
Important Note
This information applies to both Content Factory team members and external readers. However, some sections are only relevant to internal team members. Internal references are highlighted in orange. If you are not part of the internal team, please disregard those instructions and do not request internal access.
Descript (AI transcription software; internal team has access)
Step-by-Step Process
Estimated Time: A 60-minute video typically takes about 3 hours to repurpose into a post.
Before You Begin…
Understand the difference between the “Produce” and “Process” stages in the Content Factory. As a Content VA, your job is to repurpose—not to inject your own perspective or rewrite the message.
A common issue is when VAs make the #1 VA mistake and mindlessly use ChatGPT to repurpose a video’s transcript into an article, without watching the video. This results in generic, vague articles that miss the point entirely.
Another major issue is content duplication. Each video should not always result in a brand-new post. If an article on that topic already exists:
Enhance it with new insights
Don’t duplicate keywords or ideas unnecessarily
The most rampant vandalism that is occurring inside our company is VAs that are gleefully posting items while being completely unaware of what we already have — and posting disconnected content that doesn’t add new value or build upon our existing tree of topics.
We’ve tried to solve this problem by clearly explaining in our SEO training that each page should focus on one unique keyword to avoid having many pages competing for the same keyword.
Upload the video to the designated Google Drive folder
Upload to Descript as well
Follow the file naming and folder organization guidelines mentioned in our Level 1 VA guide.
Step 2: Transcribe the Video
Not all videos warrant full transcription. Reserve Descript and white-glove transcription for high-authority content (featuring figureheads, professionally filmed, clear messaging, etc.).
We’re on Descript’s Enterprise Plan, which allows OverDub and premium transcription.
Costs:
White-glove: $2/minute
Self-serve: $0.07/minute with the $20/month plan
Transcription Steps
a. Confirm the video hasn’t already been transcribed b. Log into Descript with your team credentials c. Click + New Project, then select Video project d. Click Upload a file e. Rename the file to something descriptive f. Review the transcript—words underlined in blue need corrections g. Right-click and correct words manually h. When complete, go to File > Export > Text i. Save it to the proper Shared Drive folder
Search Google and our internal blog database for the target keyword.
If we already have an article on the same topic:
Do not create a new one.
Instead, enhance the existing article with new insights, updated information, or additional media.
Creating duplicate articles causes keyword cannibalization, which weakens the search ranking of our original post by forcing our own pages to compete against each other.
b. Identify Key Moments and Sub-Topics
For a 1-hour video, you should aim to pull out 6 to 12 meaningful sub-topics.
Each sub-topic typically corresponds to about 5–10 minutes of content.
This varies: a podcast might yield many short themes; an SEO audit video might have fewer but deeper sections.
Preserve the full conversation whenever possible. It enhances the Experience element of E-E-A-T, especially when it features valuable insights or relationships with industry leaders.
Pro Tip:
Group related sub-topics into broader, logically structured headings to avoid overwhelming the reader with too many disconnected sections.
c. Add Multimedia: Photos, Videos & Clips
Use your team access to find visual enhancements:
Google Photos & Amazon Photos: Search for behind-the-scenes, speaker headshots, event photos, etc.
Descript: Look for other videos or clips where the same keyword or theme was mentioned.
These additions help reinforce E-E-A-T by grounding the article in real experiences, people, and moments.
Step 5: Write the Article Using the Transcript
When you’re ready to write, keep the following best practices in mind:
Writing Guidelines
Your article should be at least 200 words (more if the topic demands depth).
Write in a clear, active voice.
Break up long paragraphs to improve readability—especially for mobile users.
Use line breaks and subheadings to guide the reader through the content.
Avoid including specific dates, events, or limited-time promotions. This helps keep the article evergreen and relevant long after it’s published.
Example
Refer to the formatting in the article “Building Relationships and Amplifying Reputation with AI Tools.” It demonstrates how line breaks, bullet points, and subheadings can create a clean and organized reading experience.
Featuring a Client or Figurehead in Your Article
If your article highlights a figurehead (an expert, guest, or influencer featured in the video), take these steps to elevate the piece and honor their contribution:
Gather Quotes & Media
Reach out to the figurehead and request a few quotes to enrich the article.
Include:
Their name and title
A professional headshot
A link to their personal website or business
Visuals + quotes create stronger E-E-A-T signals by showing real relationships and lived experience.
Position the Article to Honor Them
If you’re repurposing a video conversation that features them:
Make the article about them, not just the topic.
Use their name in the article title (e.g., “Richard McClure on Smart HVAC Marketing”)
Start the article with a sentence that makes it clear why they’re worth listening to
Promote the Article to Their Audience
After publishing:
Tag them on Twitter, Facebook, or LinkedIn
Let them know the article is live (See Step 15 below)
Encourage engagement so their followers also benefit—and your blog gains visibility
Example: See how we honored Richard McClure of Fox Air & Heat in one of our featured pieces.
Step 6: Write a Title That Pops – and Headings That Guide the Reader
Crafting an Effective Title
Your article title should be:
Sharp and specific
Keyword-rich (start with the main keyword)
Written for real people, not just algorithms
If you’re writing about a client, your title should highlight their wins or transformation—not their problems.
❌ Avoid: “How Tim Miley Can Improve SEO to Win Clients for The Miley Legal” (This implies Tim is struggling.)
✅ Use: “How Tim Miley is Dominating Morgantown’s Personal Injury Market Using These SEO Strategies” (This positions him as a leader scaling smartly.)
Always write titles with the client’s reputation in mind. We don’t write titles that make them look weak—we elevate them.
Using Headings in WordPress
Use headings to structure your article cleanly:
H1: Used once — it’s the article’s main title (usually added by WordPress automatically)
H2: Main subheadings
H3: Sub-sections under H2s
Best Practices for Headings
Keep them brief and eye-catching
Accurately summarize the next section
Don’t overdo it — no “heading abuse”
Heading Abuse Example: Adding a new heading every 3–4 lines (a common issue with AI-generated articles)
Tip:
Use SEO tools like Surfer SEO or Frase to:
Analyze competitor headings
Structure your own H2s and H3s more effectively
Ensure some headings contain the main keyword
Step 7: Start with a Hook — Then Establish Clear Context
Your First Line = The Hook
Must be engaging and immediately grab the reader’s attention.
Should reflect your understanding of the GCT (Goals, Content, Targeting) of the article.
Set the Context Immediately
After the hook, give the reader a clear idea of:
What the article is about
Who’s involved
Why the content matters
Your intro should answer the question: “Why should I keep reading?”
Notes for Internal Team Members (Publishing to blitzmetrics.com or dennisyu.com)
If repurposing a video:
Start by explaining the background of the video:
Who is featured in it?
How do we know them?
What is the context—event, call, webinar, etc.?
Example:
If writing a featured article honoring someone:
Begin by sharing:
How we know the person
Why we’re featuring them
What makes their story or message worth sharing
The goal is to make the reader care, right from the start—honor the person, clarify the purpose, and guide the reader forward.
Example:
Answer the Question Immediately in the First Paragraph
If the article is built around a question (e.g., “How long does it take to build a pool in South Florida?”), the reader should not have to scroll or skim to find the answer. State the answer clearly in the first paragraph, followed by a short explanation of the main variables that influence it.
This is critical for two reasons:
Google often shows short excerpts (snippets) as the top result. Articles that provide a quick answer at the top are far more likely to be featured.
Readers expect fast, clear answers. Burying the answer reduces engagement and increases bounce rates.
Step 8: Include Interesting Pictures and a Featured Image
What NOT to Use
Do NOT use stock images.
Do NOT pull random images from Google Image Search.
The Featured Image
Every blog post must include a featured image.
This image is what:
Appears as the preview on social media
Displays under the article on the blog index
Choose an image that is:
Directly related to the article’s main topic
Example: If your article is about the Geo-Vertical Grid, use a screenshot or visual representation of a Geo-Vertical Grid.
Images Within the Article
1. Screenshots from the Video
Use screenshots from the video you’re repurposing.
Make sure the screenshots:
Illustrate what you’re describing
Are relevant and clear
Here’s an example of an article about an SEO audit for a website, with video screenshots as images:
This is how images within your repurposed article should look like
Use colored boxes around important numbers to draw attention:
Green = Positive (what something should look like or what to add)
Red = Negative (what something shouldn’t look like or what to delete)
Real Photos from Dennis Yu’s Phone
Use real images related to the article.
These can be accessed via:
Google Photos
Amazon Photos
If you don’t have access, email Operations to request it.
Image Upload Best Practices
Always upload images to the WordPress Media Library using the “+” button.
Do NOT paste images directly from Google Docs or external sources—this causes:
Broken links
Display issues on the live site
Important: Add captions and alt text to every image, diagram, or embedded video for accessibility and SEO.
Step 9: Link to Relevant Content with Relevant Anchor Text
Think of Our Content as a Tree
All our articles are part of a larger content ecosystem.
Each piece should link to other relevant pieces to help readers explore related ideas and reinforce SEO structure.
Prioritize linking to:
Our own content on blitzmetrics.com, yourcontentfactory.com, and dennisyu.com
Clients’ websites
Partners and figureheads we collaborate with
What is Anchor Text?
Anchor text is the clickable, visible part of a hyperlink—often in blue.
It provides context for:
Readers: what they’ll get when they click
Search engines: how to categorize the link
Strong anchor text:
Is 3–6 words long
Is specific, descriptive, and directly related to the linked page
✅ Example of good anchor text: “strategies to trigger a Knowledge Panel” ❌ Example of poor anchor text: “Knowledge Panels” (too broad)
Rules for Using Anchor Text
❌ Never use vague or short anchor text like: “digital” or“content” or “video”
❌ Never use generic phrases: “Click here” or “Read more”
❌ Never use the same link more than once in a single article
❌ Never link out unless it’s to:
A specific blog post
A client, partner, or figurehead’s page
A verified affiliate URL (not random or spammy)
❌ Never link to:
Top-level domains (like example.com) unless it’s a partner or client
Files (e.g., .pdf, .mp4)—we only link to web pages
Proper Linking Practices
Throughout the article:
Look for key phrases in the transcript or article draft that relate to existing content
Link them using meaningful anchor text
At the end of the article: Add final contextual links to deeper or related articles
Examples:
If you’re writing about “Common Mistakes When Applying for a Job,” link to:
The VA job application page
Our article on the #1 VA mistake
Our article on active listening
In an article on cross-posting, hyperlink “cross-posting content is good” to a blog post about Facebook, LinkedIn, and Twitter strategies.
Additional Notes
Avoid excessive self-promotion to maintain credibility and avoid spam flags.
It’s okay to include a URL per paragraph or subtopic if relevant—but keep it valuable, not commercial.
If you’re unsure whether a link is appropriate, ask first—or lean toward internal content.
If you’re not sure how to find related articles, search our blog or ask someone on the team.
Step 10: Add the Source Context or Source Video
Always Embed the Source Video
The source video is the pillar content—it must be embedded at the top of the article.
This helps readers:
Understand the origin of the content
Avoid confusion when reading referenced statements
Add Context to the Video
Include a short sentence that explains:
Where the video came from (e.g. a webinar, internal meeting, client training)
Why it’s relevant to the article
If the Video Hasn’t Been Edited Yet
If your video hasn’t gone through MarketScale editing:
Step 11: Proofread – Use Grammarly or ChatGPT for QA
Proofreading is Mandatory Before Submission
You must quality-check (QA) your article before sharing it for review
Run the entire post through a grammar/spell checker:
Use the Grammarly browser extension
Or use ChatGPT to intelligently proofread (paste in 5–6 lines at a time for best results)
If Drafting in Google Docs
Click the Grammarly icon in the bottom right corner to review suggestions
❌ Eliminate These Writing Issues:
No fluff or filler
Don’t use vague or general statements not present in the original video
Example of fluff: “Navigating the complexities of the digital world…”
No repetition
Combine repeated video concepts into one concise paragraph
Speech is repetitive—writing should be structured
No long paragraphs: Keep paragraphs between 3 to 5 lines
No run-on sentences: Split long sentences into 2–3 shorter, clearer ones
No passive voice
Use active voice for clarity
✅ “I reviewed the article.”
❌ “The article has been reviewed.”
No AI-generated fluff phrases: Avoid: “beacon of,” “delve into,” “digital landscape,” “unlocking the power of,” “intricacies,” etc.
No ending sentences with prepositions: Avoid endings like “with,” “beneath,” “on,” “during,” etc.
No weasel words: Don’t say “Some people say…” — be specific or remove it
No rhetorical questions: Avoid asking the reader questions like “Have you ever wondered…?”
No heading abuse
Don’t add headings every 3–4 lines (a common ChatGPT mistake)
Ensure every H2 has substantial content beneath it
Only include headings when they actually help the reader skim and navigate
Example of Misuse (Shown in the Image Below)
Red boxes = Too many H2s with very little content in the paragraphs below = Heading Abuse
Red-highlighted phrases = Fluff
AI-generated content with too little depth = Low-quality output
Examples of ChatGPT Misuse
Use ChatGPT wisely—not to write the article, but to refine and improve your own work.
Step 12: Post on WordPress
Creating a blog post on WordPress is simple.
Follow the internal task guide to walk through each step.
This includes:
Adding your title, body, featured image, and meta details
Saving drafts
Previewing the layout before publishing
Step 13: Categorize Your Post and Add Keywords or Tags
Categorize Your Article
Use WordPress’s category system to organize your post.
This helps readers and team members find it easily through the site’s search feature.
Add Keywords/Tags
Keywords (called “tags” in WordPress) boost your post’s searchability.
You can add up to five relevant tags.
Use important terms or proper nouns mentioned in your article.
Example: “Content Factory,” “Dennis Yu,” “Facebook Ads,” “GCT,” etc.
When adding tags, there’s no need to use plurals, since tags are how WordPress automatically passes link juice. For example, ‘Google Knowledge Panel’ should suffice as a tag. You don’t need to create a separate tag for ‘Google Knowledge Panels’.
✅ Tip: Tags help internal SEO and improve how readers discover content related to a specific topic
Step 14: Apply SEO Plugins
a) Use RankMath Plugin
RankMath is located in the top right corner of the article edit screen
It breaks your on-page SEO into four areas:
Basic SEO
Additional
Title Readability
Content Readability
Click each section’s dropdown to view and apply improvement suggestions
RankMath also includes a tool to recommend inbound links from other pages/posts on your site
b) Use LinkWhisper Plugin
Found at the bottom of the WordPress article editor
LinkWhisper suggests internal links to related content
How to use it:
Review the list of suggested links
Check the box next to the ones you want to include
Click “Insert Links into Post”
After inserting:
Click “Edit Sentence” to adjust anchor text
Avoid vague suggestions—make anchor text specific and descriptive
You can also open a separate LinkWhisper tool to choose inbound links from other articles—follow the same process as outbound linking
Step 15: Email and DM the Client
How to Find the Client’s Contact Info
Search on Facebook, LinkedIn, or Google using the client’s name
Hi [Client’s Name], Great news! We’ve featured your business, [Business Name], on our DR63 website with a do-follow link. To learn more about how this helps your SEO, read: Hooray! Your SEO Improved With a DR63 Link From Us! Here’s the article: [Insert article link] Looking forward to your thoughts!
Best, [Your Name] Content Team – BlitzMetrics
Step 16: Post in Our Facebook Group
Write a brief, descriptive post celebrating the client
As part of our team, you may occasionally be asked to assist clients in managing their Office Hours subscription.
This program, which provides exclusive access to Dennis Yu—a leading expert in Facebook Ads with over $1 billion in ad spend experience—offers valuable guidance and resources for $297 per month. However, retainer clients receive Office Hours at no additional charge. For clients who are not on a retainer, this service is available as part of a paid subscription.
If a client decides to cancel their subscription, it’s important to follow the correct steps to ensure the process is completed smoothly and efficiently.
This guide will walk you through the necessary steps to cancel the Office Hours subscription on behalf of a client, ensuring that everything is handled professionally and without hassle.
Task Checklist
Information that you will need
The Email Address or Complete Name of the account you wish to cancel.
Reason for cancellation (this will need to be specified in Keap when updating the subscription status).
Tools that you will need
Keap account (for managing the subscription and updating the status).
Facebook (Admin access to the Office Hours – Members Only group, which provides weekly live support and training).
BlitzMetrics Academy access (for removing users from the Academy).
Ahrefs or another SEO tool (for identifying and tracking backlinks).
Google Search Console (to reindex pages after backlinks are removed).
Steps to Cancel Office Hours Subscriptions
1. Login to your Keap account and click on the search button.
2. On the dropdown menu, choose “Contact”.
3. Input the “Email Address” or “Complete Name” of the account you wish to Cancel.
4. Click on the (>) symbol just beside the account.
5. Click on the “ORDERS” tab.
6. Click the product or course under SUBSCRIPTION
7. Once you’re in the Subscription Setup, change current status to “INACTIVE” and put an end date and the reason for cancelation.
8. Scroll down and under Recharge Information, select “NO” to autocharge and “None selected” in the credit card dropdown.
9. Click “SAVE” and just to be sure that it’s all set, you can click on “Contact”.
10. Check on “Orders” then “Subscription” And see if it is indeed set to “Inactive”.
11. Once you set the account to “Inactive” via Keap, you can now proceed with removing the member’s access to Facebook Office Hours (Members Only).
Note: You should be an admin to the page for you to be able to do this step. For access issues, please email operations@blitzmetrics.com.
12. Go to the Facebook Office Hours (Members Only, weekly live support and training) group. Click on “Members”.
13. Find the name of the member you wish to remove.
14. Once you find the name of the member you wish to remove, click on the 3 dots and then click on “Remove Member”.
15. You have successfully removed a member and are ready to proceed with removing Academy access.
16. Go to the Academy and click “User” and then “All Users”.
17. Search on the email address of the member you wish to cancel the subscription.
18. Click “Edit”
19. Go down “User enrolled in group”. Click “Office Hours” and then the “Left Arrow” icon.
20. Click Update.
Link Removal Process (Backlinks)
If BlitzMetrics has provided backlinks to a client’s website as part of the service, we need to remove those links after the cancellation of their subscription to ensure they no longer benefit from the SEO ranking boost.
Follow these steps to remove backlinks given to the client’s site:
Steps for Backlink Removal
1. Identify the Pages with Backlinks
Use a tool like Ahrefs to identify all the pages where BlitzMetrics has included a backlink to the client’s website.
2. Edit the Posts or Pages with Backlinks
Access the backend of the site where the link was placed. Find the specific post, page, or other content that includes the client’s backlink and edit it.
3. Remove the Backlink
Once you’re in the editor, locate the client’s link within the content. Either remove the hyperlink entirely or replace it with a non-affiliated resource. Ensure the anchor text or hyperlink is fully removed from the content.
4. Save and Publish the Updated Content
After removing the link, save your changes and publish or update the content.
5. Check for Link Removal
Verify that the backlink has been removed by revisiting the page or post. You can also use Ahrefs or similar tools to double-check that the link no longer exists.
6. Reindex the Page in Google Search Console
After the link is removed, go to Google Search Console and submit the updated page(s) for reindexing. This will help ensure the link is deindexed by Google and no longer contributes to the client’s SEO ranking.
If a “Cancellation” request is accompanied by a “Refund” Request
1. Follow all the steps in “How to Cancel Office Hours Subscriptions on Keap (Infusionsoft)”.
2. Once done, go to the main account page and click “Invoices”.
3. Click on the product you want to issue a refund to.
4. Click on “Refund Payment”.
5. Check on the box under “Refund”, input the Reason for the refund, and click “Next”.
6. For the next 2 screens, click “Next”.
All set, congratulations!
Verification Checklist
✅ Verified the subscription status is set to INACTIVE.
✅ Correctly set the end date for the subscription.
✅ Entered the reason for cancellationin Keap.
✅ Disabled autocharge and ensured no credit card info is selected.
✅ Removed the client from the Facebook group.
✅ Removed the client from the Office Hours group in BlitzMetrics Academy.
✅ Removed all backlinks from the relevant content.
✅ Confirmed all steps have been followed and no actions were missed.
Manually enrolling students wastes time and creates room for error. We built an automated course enrollment system that gives users instant access to their LearnDash course the moment they’re tagged in Keap. Here’s how the BlitzMetrics video explains the steps to set it up:
Step 1: Create an Auto-Enroll Tag in Keap
In Keap, go to CRM → Settings → Tags and click Add Tag.
Name it clearly, following the template Enroll: | [Course Name] |, then save. This tag will serve as the trigger for automatic enrollment.
Step 2: Assign the Tag in Memberium
In your WordPress dashboard, go to Memberium → Courses (or Memberships).
Open the course access settings and locate Auto-Enroll Tags under the LearnDash Integration section. Enter the Keap tag you just created and save changes.
Step 3: Link the Tag in LearnDash
Go to LearnDash LMS → Courses → [Your Course] → Settings. Scroll to Learndash Memberium Integration and add the same auto-enroll tag. Save the course. Now Memberium knows which tag unlocks which course.
Step 4: Test the Workflow
We picked a test contact in Keap, applied the tag manually, and waited. Within moments:
The tag was recognized by Memberium.
The user could log into WordPress and see the course appear under “My Courses” in LearnDash. If it didn’t work: we checked that the tag names matched exactly (tags are case-sensitive), cleared caches, and verified Memberium’s API connection to Keap. Once the test passed, we moved into live mode.
The Result
What we built is more than just a link between systems. It’s a micro-moment of delight: a user gets tagged → they walk into the course as if by magic. There’s no waiting, no manual enrollment, no friction. The system sees the tag, Memberium unlocks access, LearnDash delivers content and the u

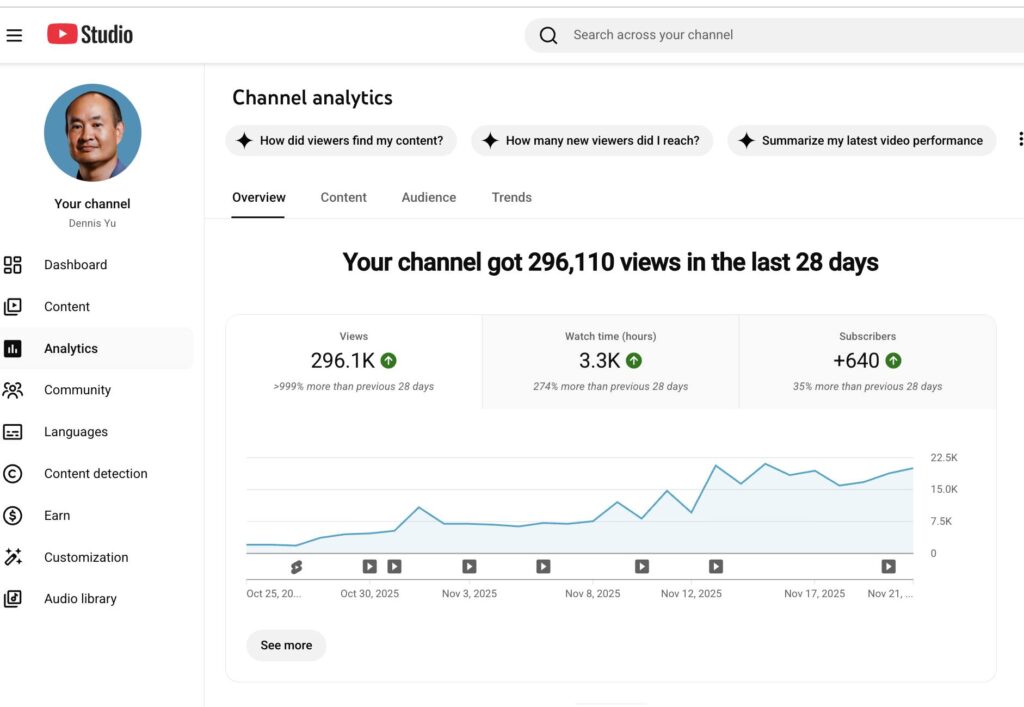
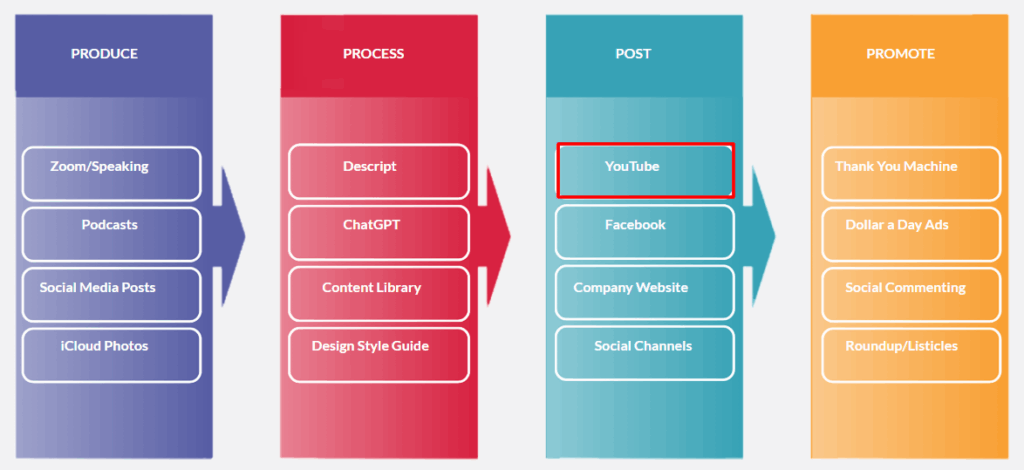
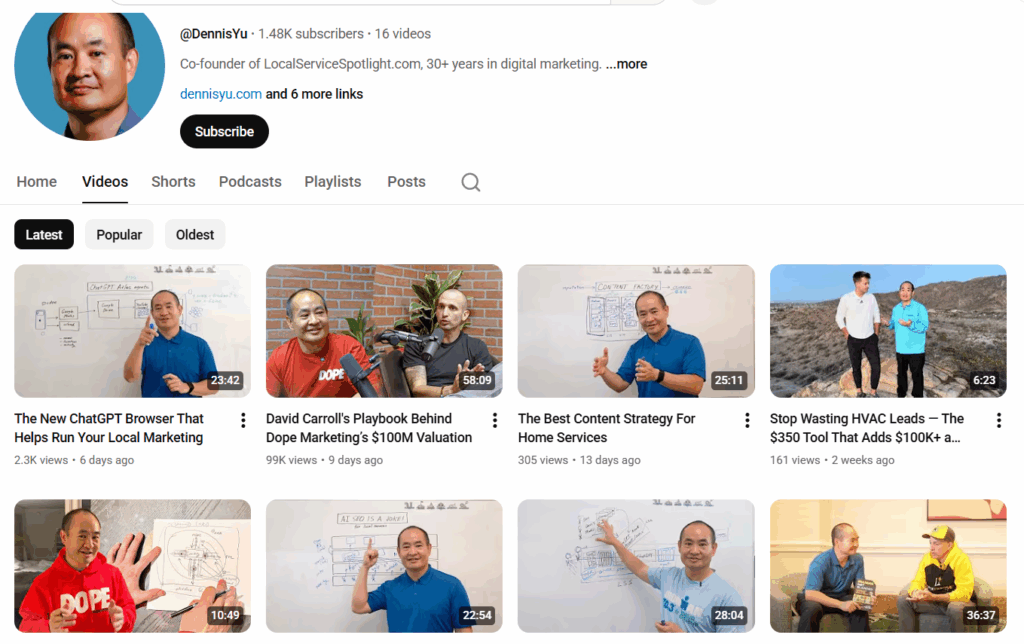
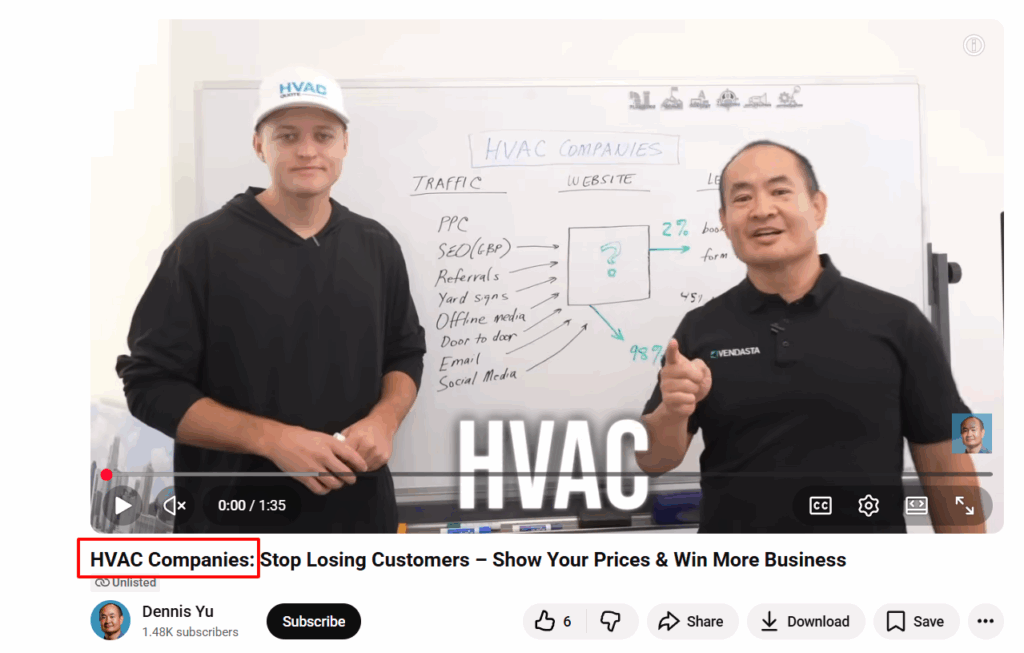
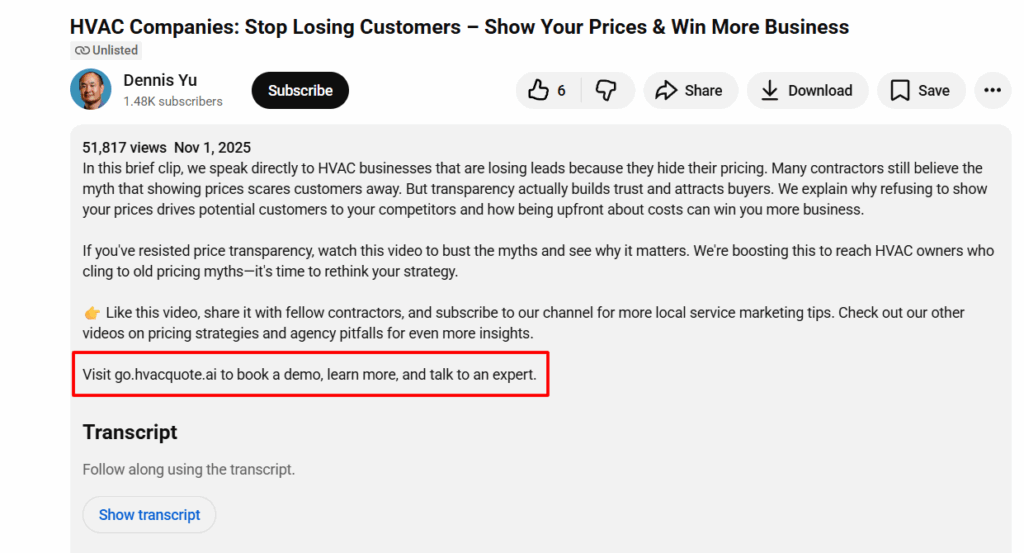
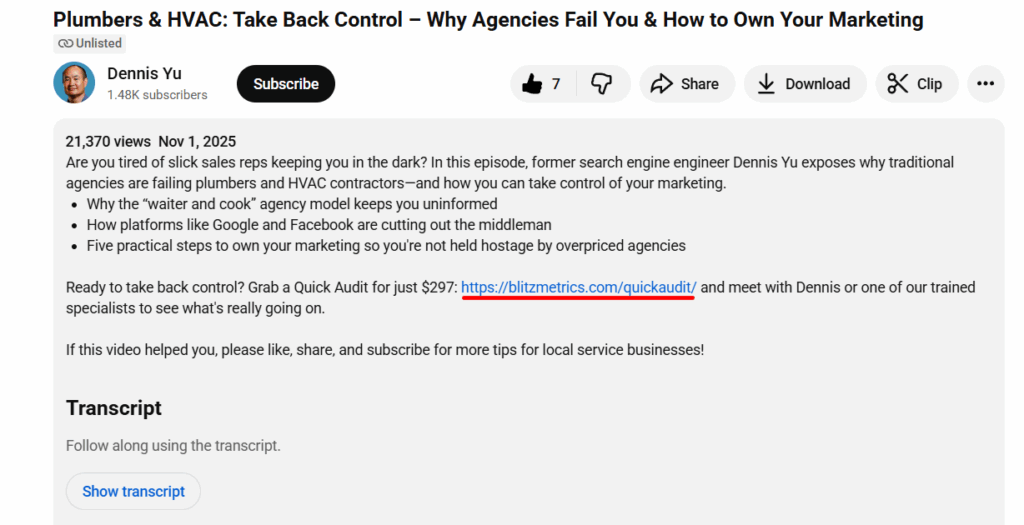
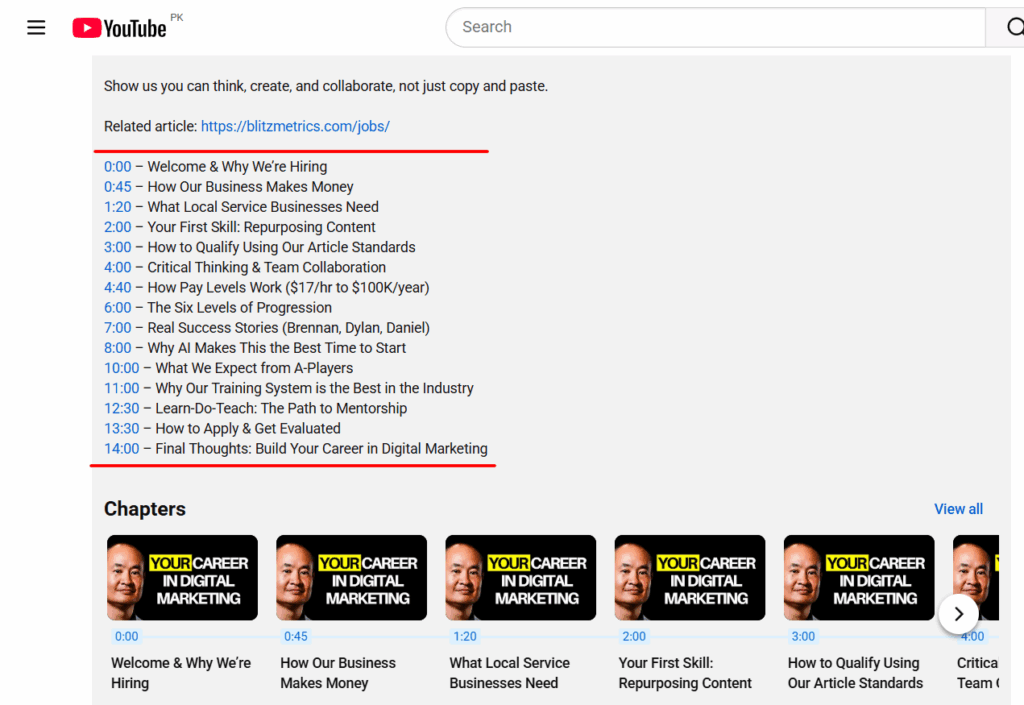
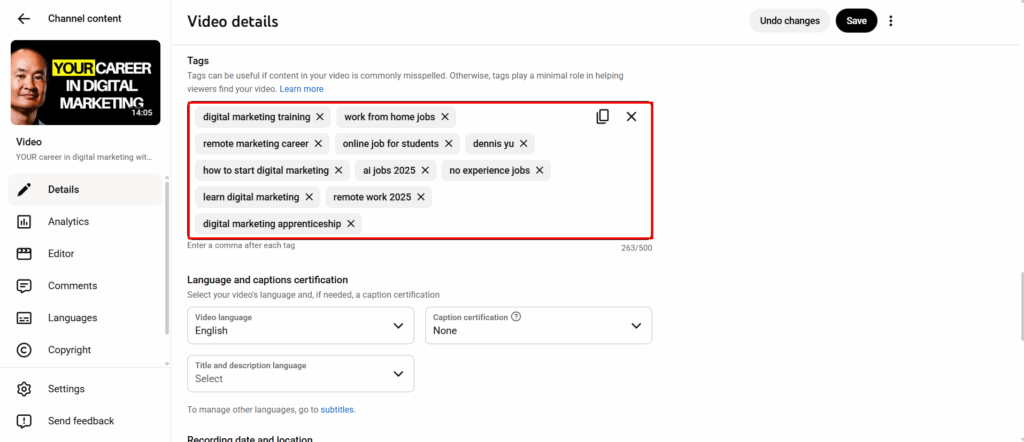
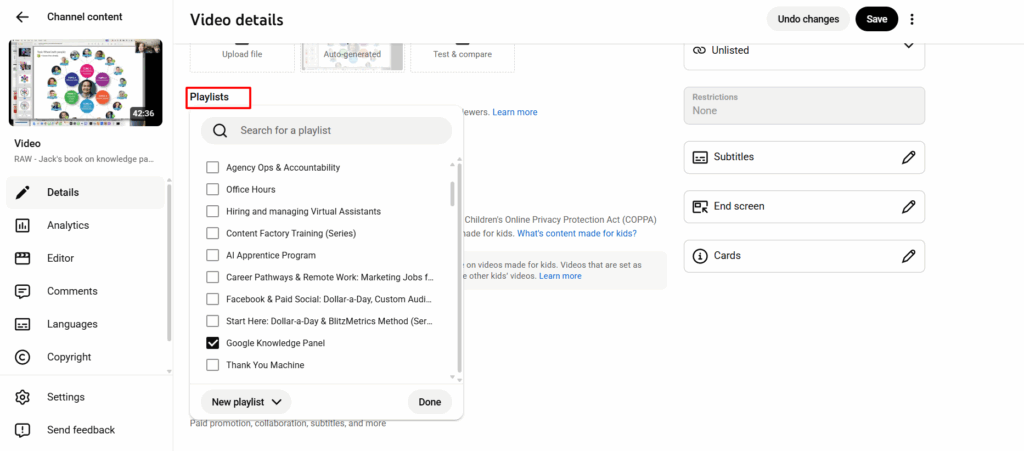
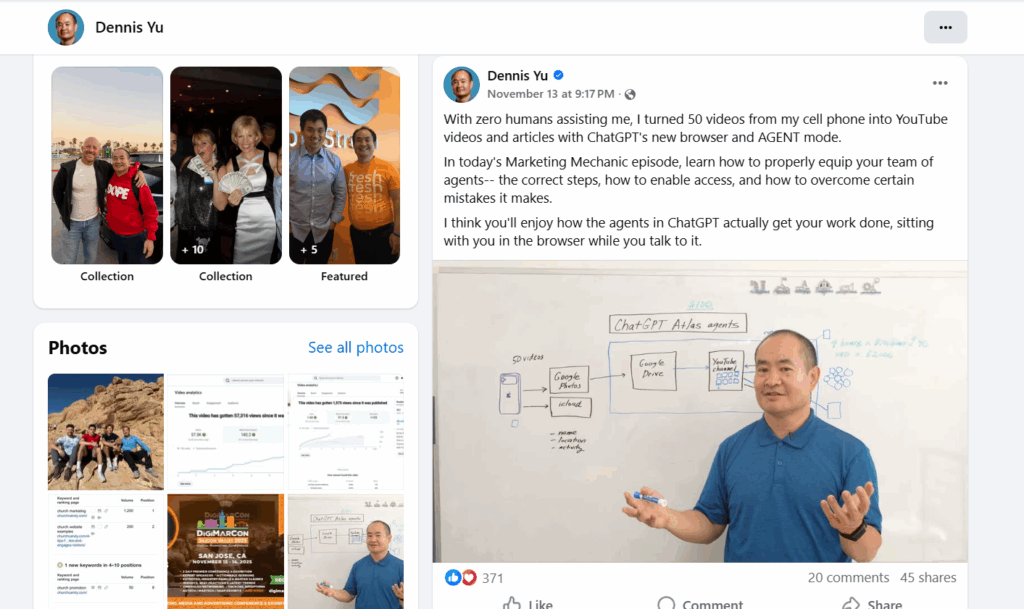
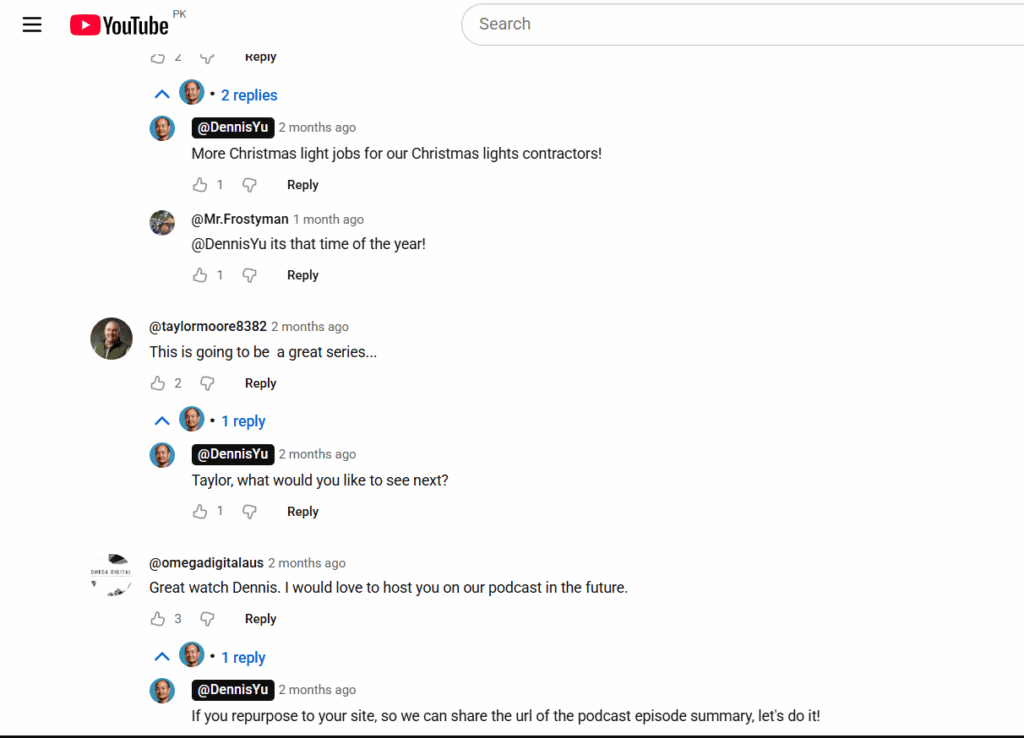
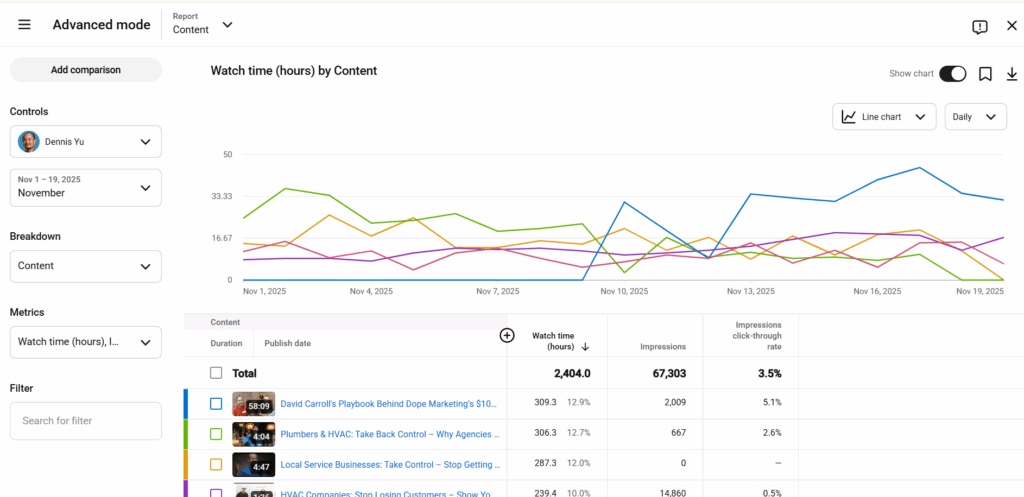
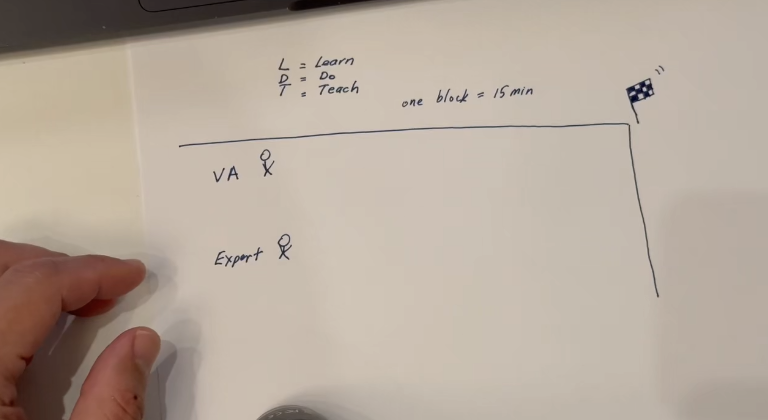
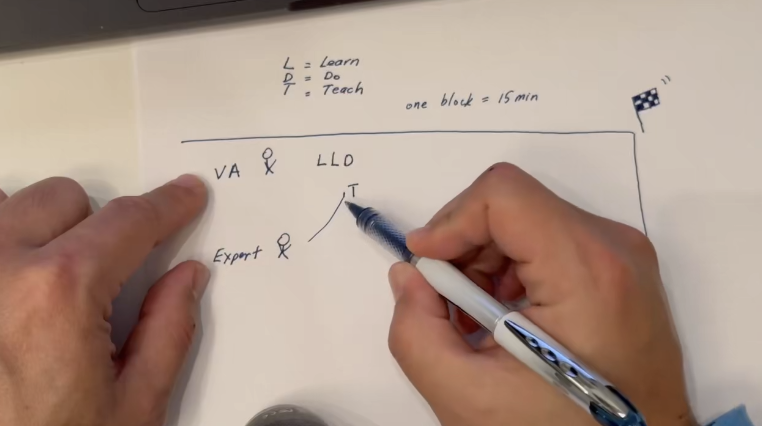
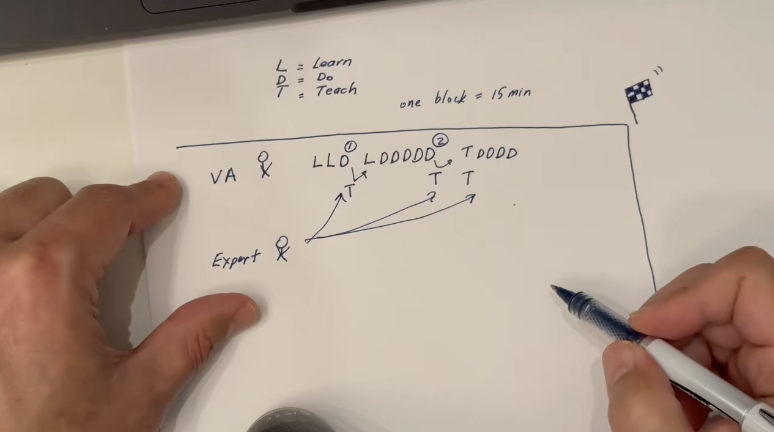
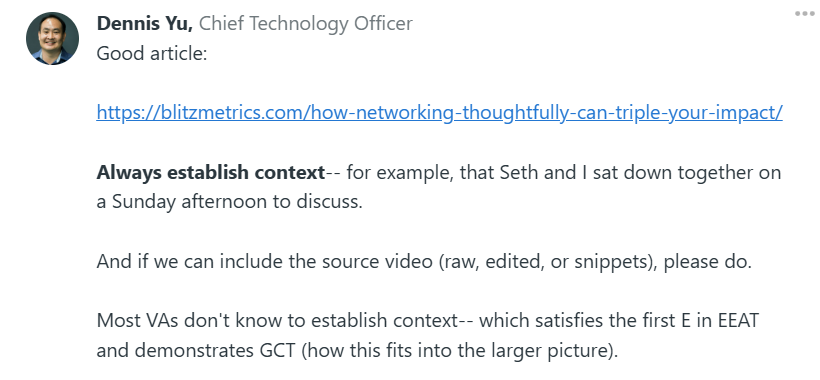


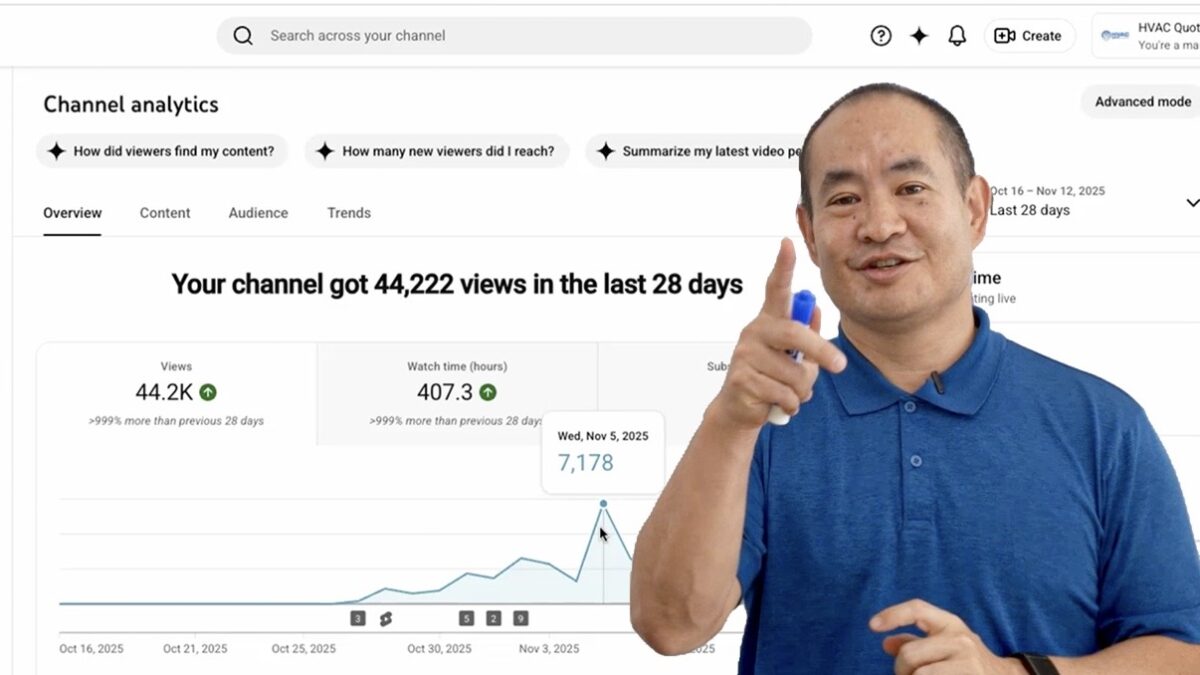
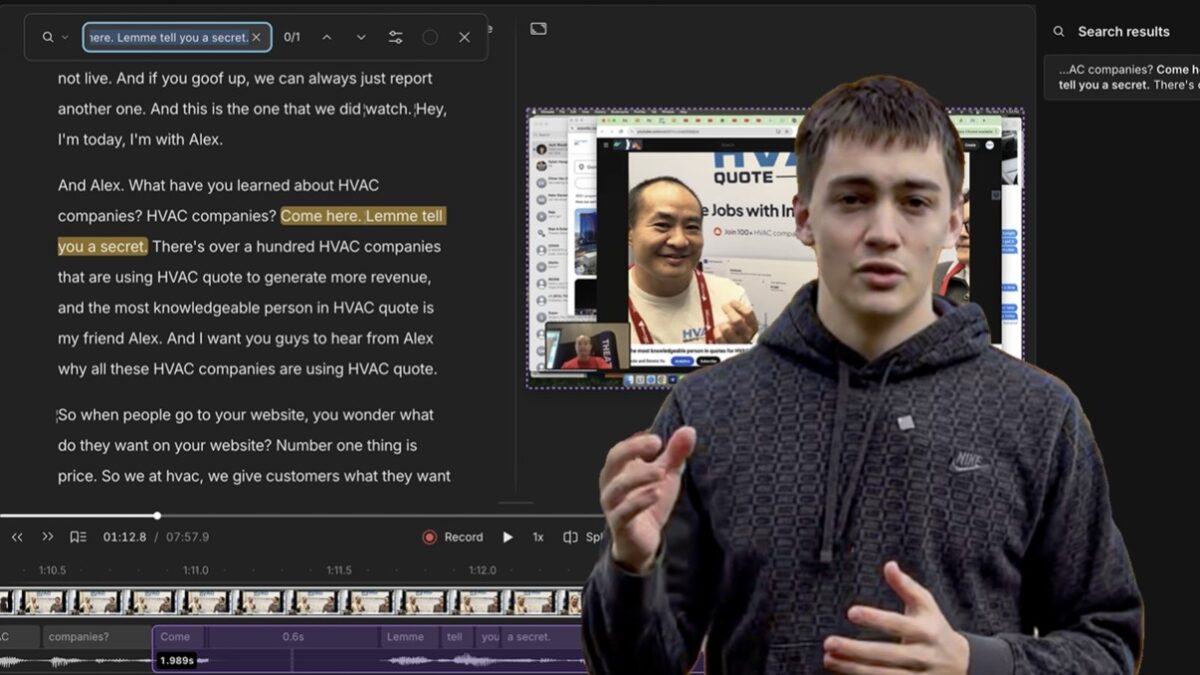
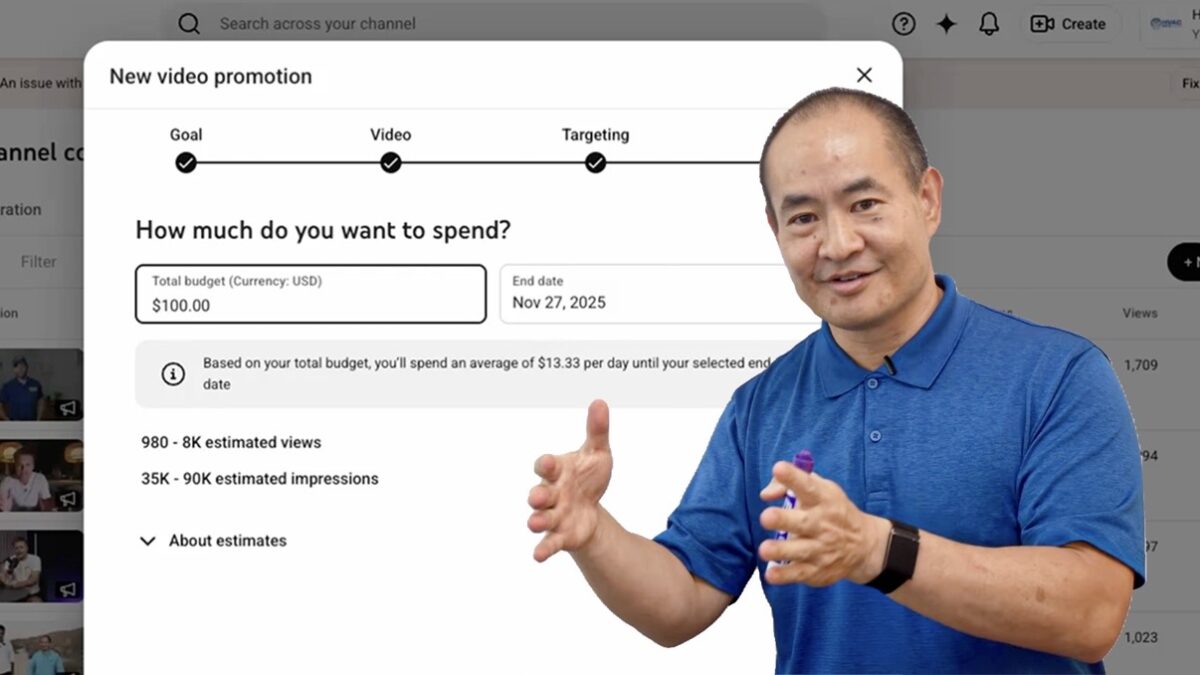

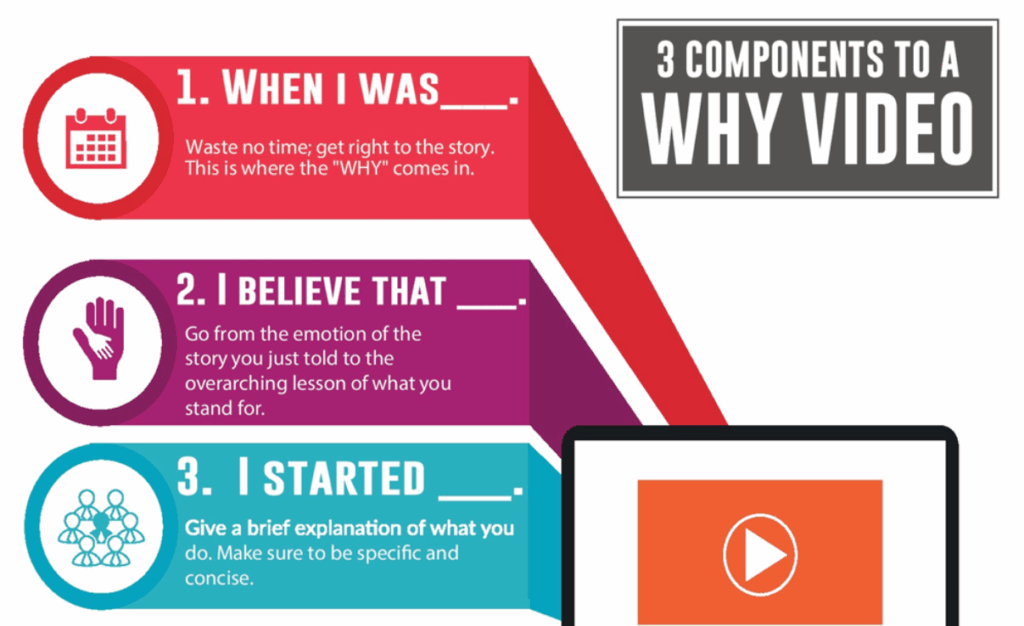
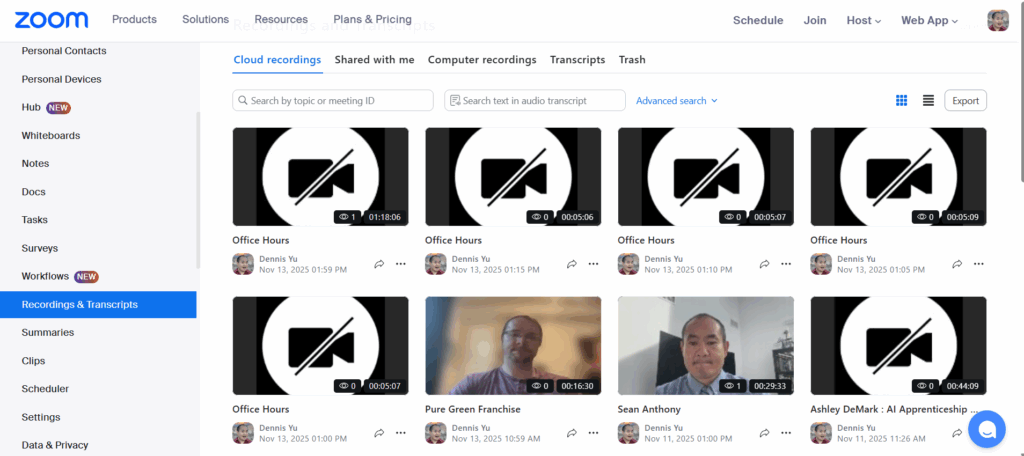


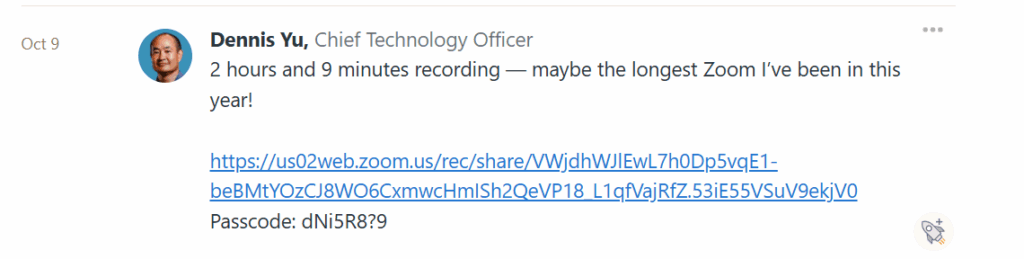

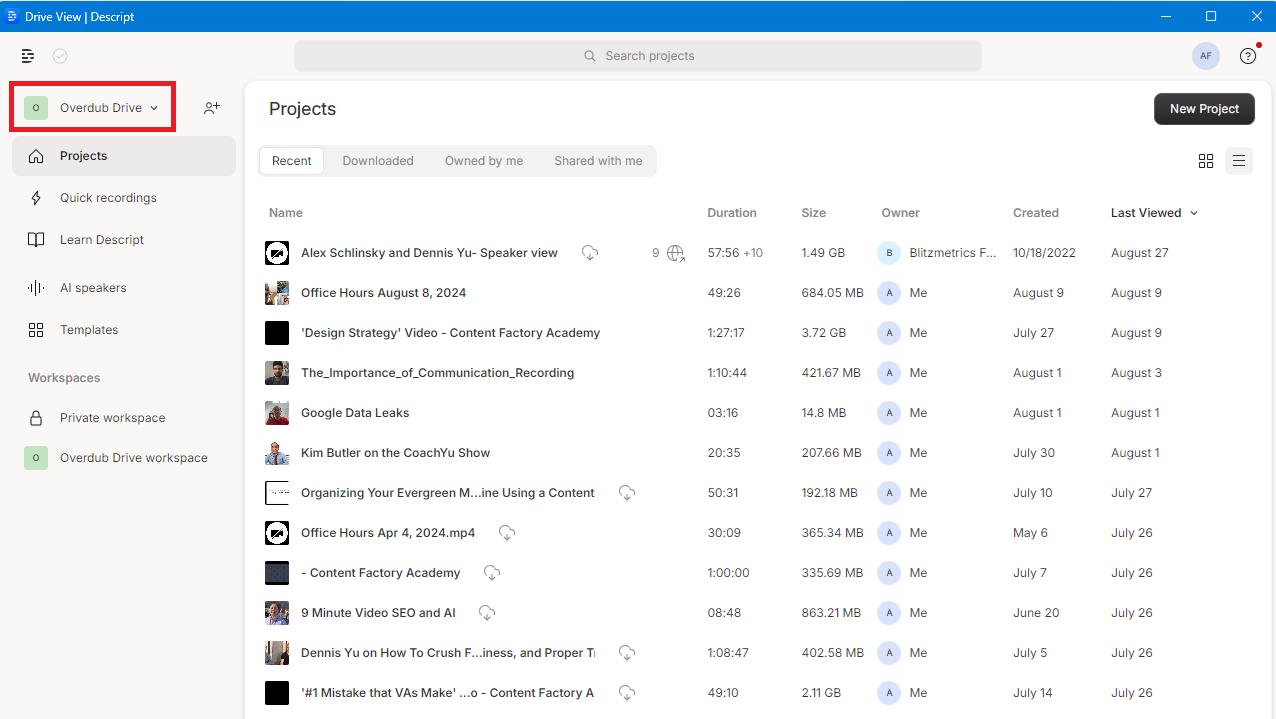
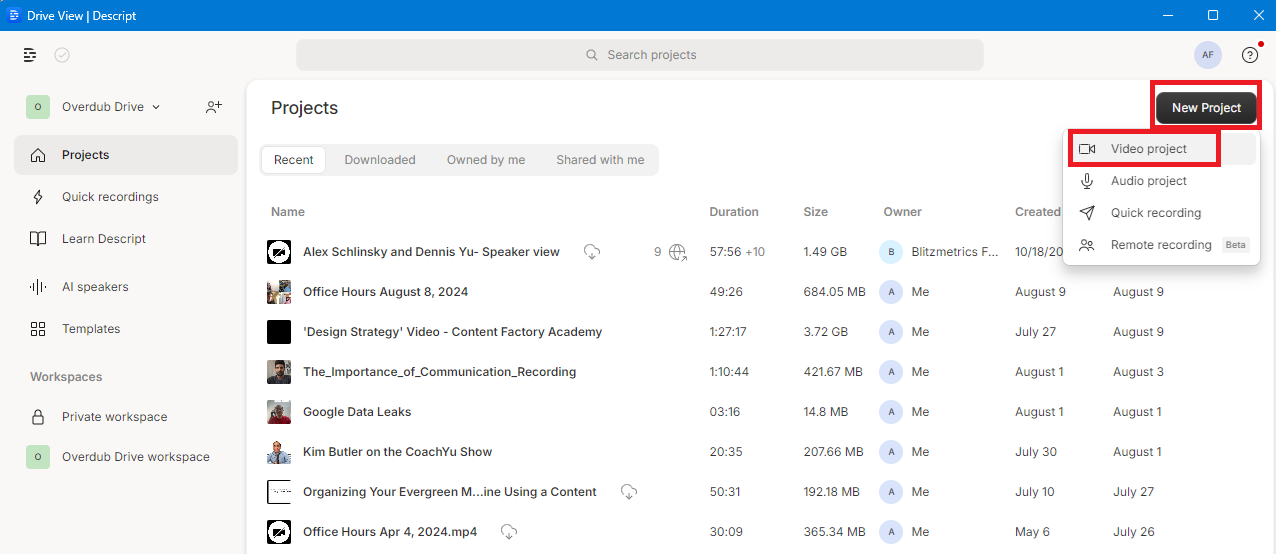
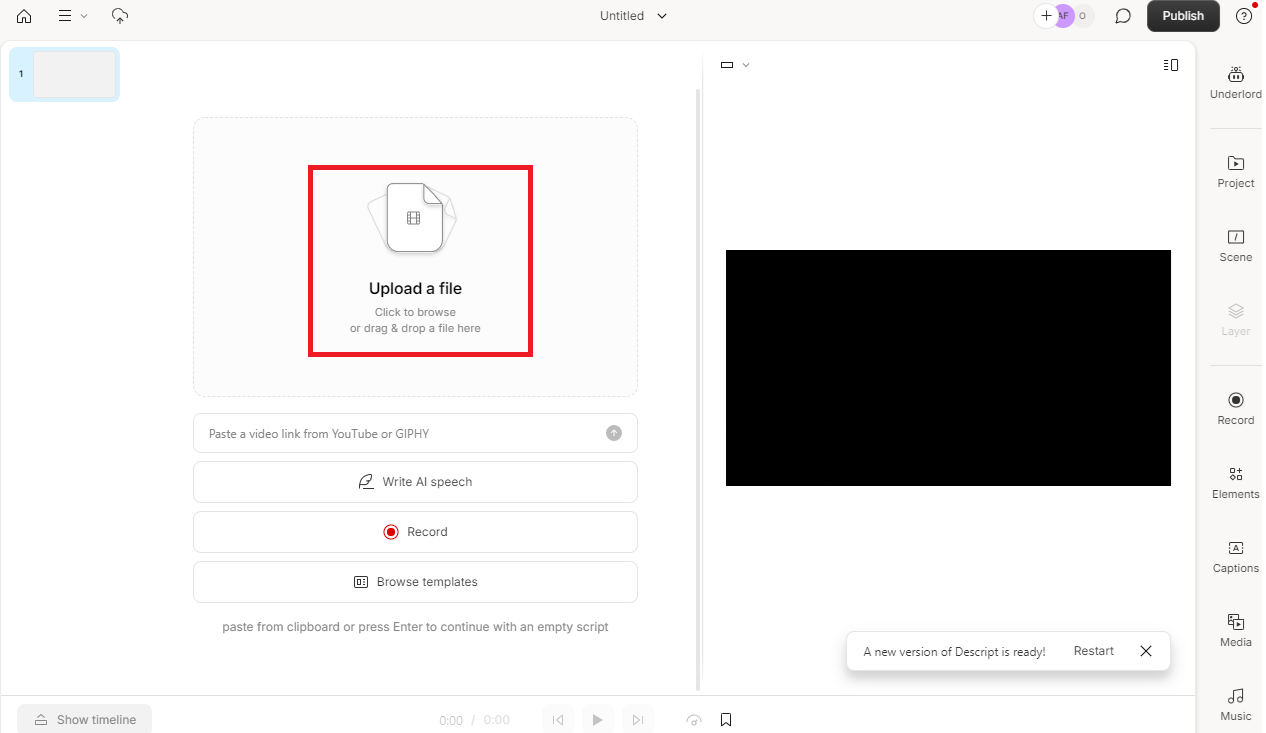
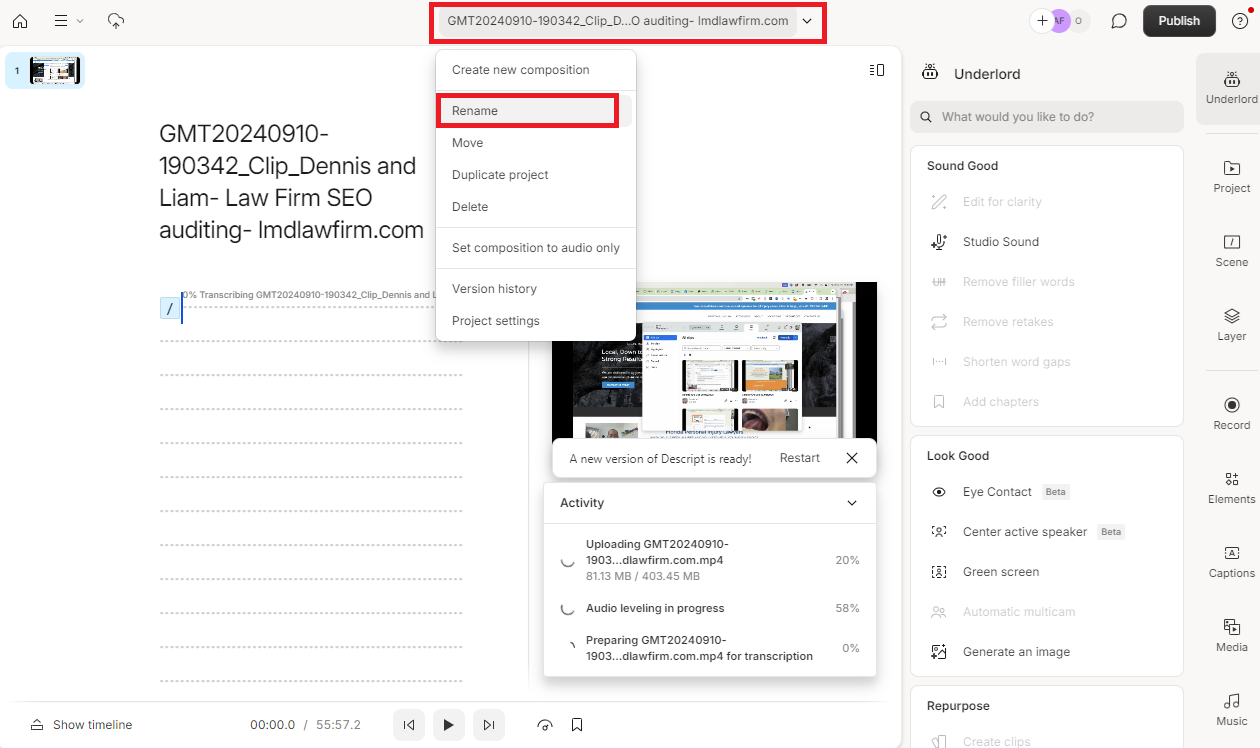

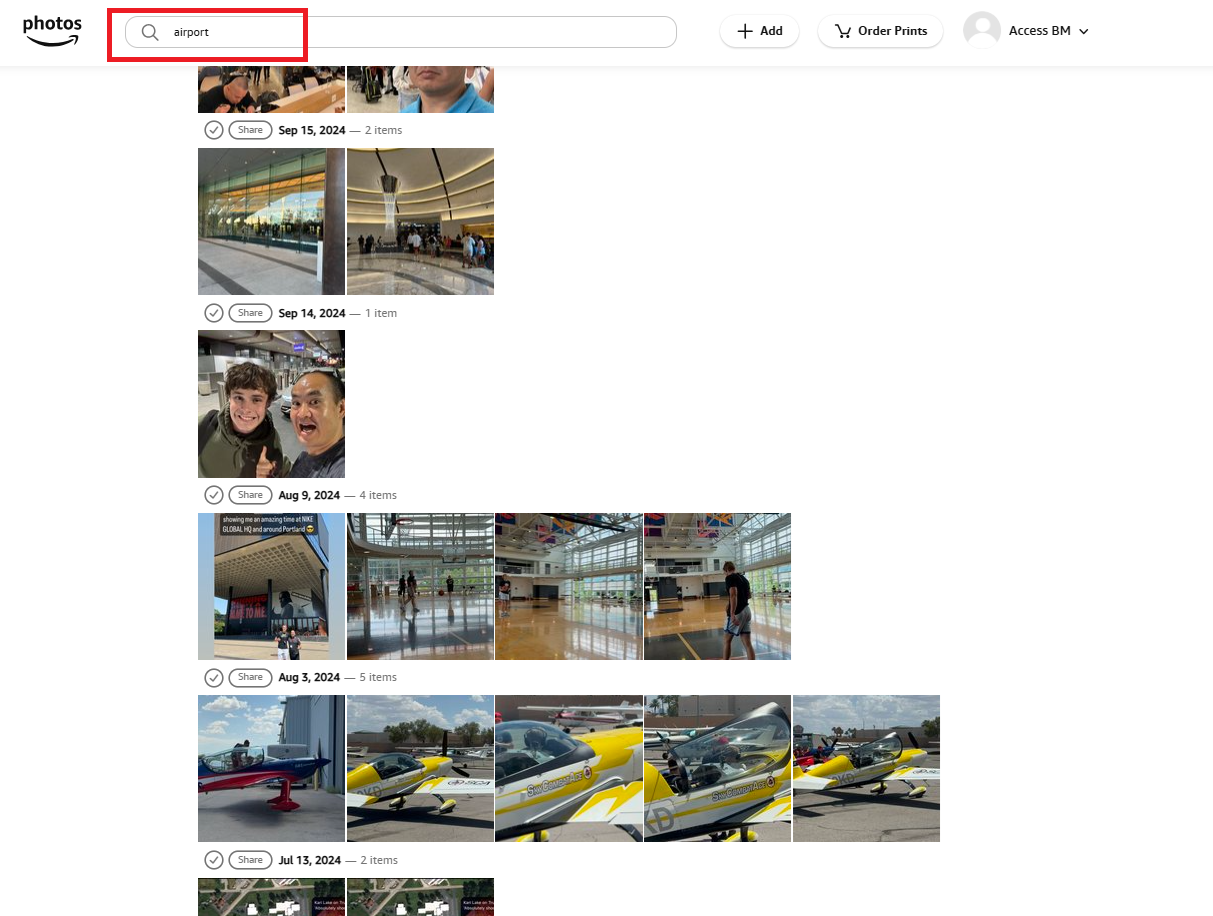


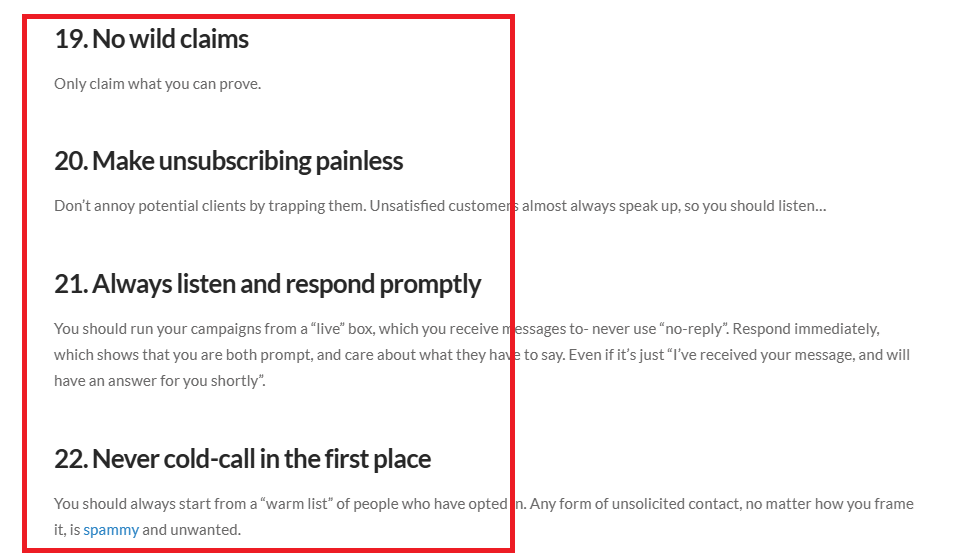


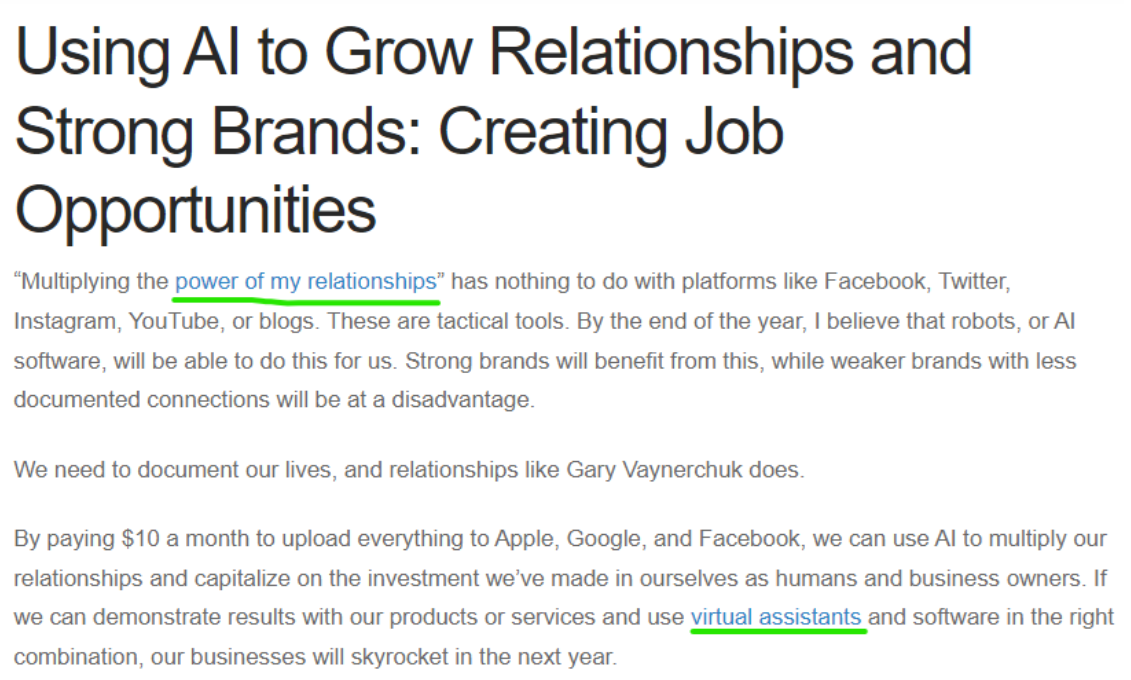
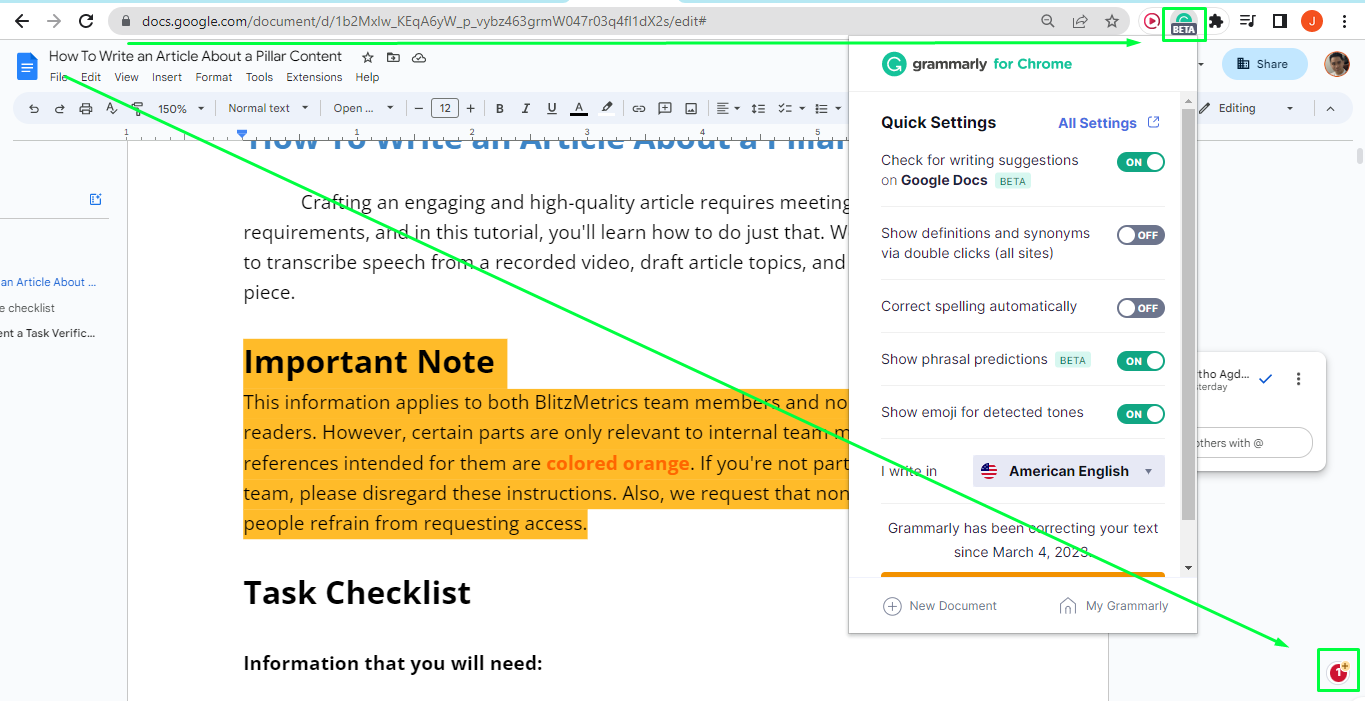
 Examples of ChatGPT Misuse