How to Set up Automated Course Enrollment tags in Learndash+Memberium

Manually enrolling students wastes time and creates room for error. We built an automated course enrollment system that gives users instant access to their LearnDash course the moment they’re tagged in Keap.
Here’s how the BlitzMetrics video explains the steps to set it up:

Step 1: Create an Auto-Enroll Tag in Keap

In Keap, go to CRM → Settings → Tags and click Add Tag.


Name it clearly, following the template Enroll: | [Course Name] |, then save.
This tag will serve as the trigger for automatic enrollment.

Step 2: Assign the Tag in Memberium

In your WordPress dashboard, go to Memberium → Courses (or Memberships).

Open the course access settings and locate Auto-Enroll Tags under the LearnDash Integration section.
Enter the Keap tag you just created and save changes.

Step 3: Link the Tag in LearnDash

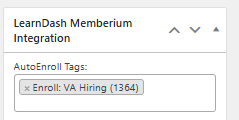
Go to LearnDash LMS → Courses → [Your Course] → Settings.
Scroll to Learndash Memberium Integration and add the same auto-enroll tag.
Save the course.
Now Memberium knows which tag unlocks which course.

Step 4: Test the Workflow

We picked a test contact in Keap, applied the tag manually, and waited.
Within moments:

  • The tag was recognized by Memberium.
  • The user could log into WordPress and see the course appear under “My Courses” in LearnDash.
    If it didn’t work: we checked that the tag names matched exactly (tags are case-sensitive), cleared caches, and verified Memberium’s API connection to Keap.
    Once the test passed, we moved into live mode.

The Result

What we built is more than just a link between systems. It’s a micro-moment of delight: a user gets tagged → they walk into the course as if by magic.
There’s no waiting, no manual enrollment, no friction. The system sees the tag, Memberium unlocks access, LearnDash delivers content and the u

How to Create and Send an Email Broadcast in Keap Classic

Every week, we send helpful insights, training updates, and reminders to our Home Service Owner community.

But instead of sending one-off messages manually, we built a repeatable process in Keap Classic (Infusionsoft) that lets us design, personalize, and deliver every broadcast efficiently — while keeping the tone warm and human.

Step 1: Accessing the Broadcast Tool

It starts in Keap’s main dashboard.
We go to Marketing → Email & Broadcasts, then click + New Email Broadcast.

This is our control center — where each announcement, promo, or newsletter begins.
No complicated automation here; just a clean, one-time email to a segmented audience.

Step 2: Choose a Template or Start From Scratch

Keap gives you three starting options:

  • Use a blank email — start from zero for complete creative control.
  • Select a pre-made template — great if you want a professional layout fast.
  • Use a recently sent email — ideal if you’re resending to a similar audience.

Step 3: Design Your Email

Inside the drag-and-drop builder, you can:

  • Add text, images, buttons, and dividers.
  • Adjust styles, spacing, and layout.
  • Personalize content using merge fields, such as ~Contact.FirstName~.

Example: “Hey ~Contact.FirstName~, we’ve got something exciting to share!”

Step 4: Set Your Subject Line & Pre-header

Your subject and preview text are critical for open rates. Pro Tip:
Keep subject lines under 50 characters
Use the preview to spark curiosity or summarize the email

Step 5: Choose Your Recipients

You can send to:

  • Tags
  • Saved searches
  • Individual contacts or lists

Only marketable contacts will receive your email. Avoid sending to unengaged or unverified contacts.

Step 6:  Send or Schedule

You’ll get the option to:

  • Send immediately
  • Schedule for a specific date/time

Before sending:

  • Preview mobile & desktop
  • Test all links
  • Review time zone

Final Tips

  • Personalize every email with your contact’s name.
  • Keep messages short and visually clean.
  • Test before sending to catch any issues early.
  • Reuse and improve successful templates to save time.

That’s it!
You’ve now learned how to create, schedule, and send a broadcast email in Keap Classic — the same process we use to reach Home Service Owners and other client segments efficiently.