
How to Automate AI Apprentice Program Onboarding Using Stripe, Zapier, Keap, and Basecamp
Task Checklist
What you need before starting:
- Access to your Stripe account (with a completed AI Apprentice purchase available for testing)
- Access to Zapier (free or paid plan — paid is needed for multi-step Zaps)
- Access to Keap (Infusionsoft) with admin permissions to create contacts, tags, and campaigns
- Access to Basecamp 3 with an existing AI Apprentice project template
- The AI Apprentice Price ID from your Stripe dashboard
- Keap Tag IDs for the AI Apprentice program (in this setup:
1817and1821) - Team member email addresses for Basecamp project assignment
Tools you will use:
- Stripe — payment trigger
- Zapier — automation middleware
- Keap (Infusionsoft) — CRM and email campaign platform
- Basecamp 3 — project management
Understand the Problem First
When someone purchases the AI Apprentice Program, a chain of manual tasks follows. Someone has to create a contact in Keap, apply the right tags, fire the welcome email sequence, create a Basecamp project, and add the team. Done manually, this takes time and creates room for errors.
The goal of this Zap is to trigger all of that automatically the moment a Stripe payment is confirmed — with zero manual steps required.
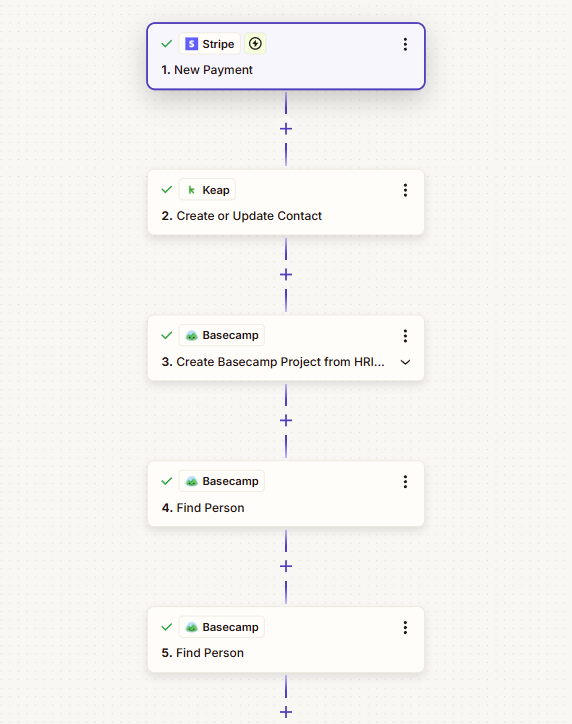
See the Full Workflow at a Glance
Here is the complete automation flow before we walk through each step:
Stripe Payment Confirmed
↓
Create or Update Contact in Keap
(name, email, tags 1817 + 1821, opt-in)
↓
Keap Campaign Fires Automatically
(welcome email, credentials, onboarding sequence)
↓
Basecamp Project Created from Template
(“HRI’s AI Apprentice: [Customer Name]”)
↓
3 Team Members Added to the Project
(Dennis, Dylan, Muzamil)
↓
✓ Onboarding complete — team ready to collaborate
Set Up the Zap
Open Zapier and click Create Zap. Name it Stripe → Keap — AI Apprentice Onboarding. A clear, descriptive name matters when you are managing multiple Zaps.
Click Continue once the Zap is named.
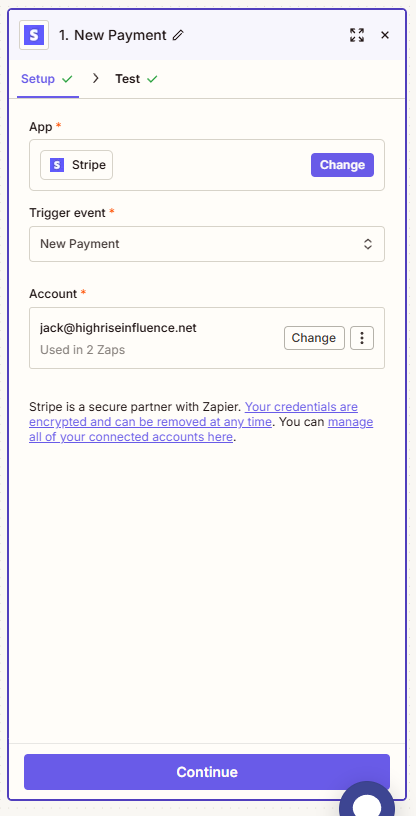
Configure the Stripe Trigger
This is the event that starts the entire automation.
- App: Stripe
- Trigger Event: If you use Stripe Checkout (their hosted payment pages), choose Checkout Session Completed. This event is the most reliable — it includes the purchased product’s Price ID and the customer’s email in a single payload.
- If you use direct charges or subscriptions instead of Checkout, use Invoice Payment Succeeded or Customer Subscription Created.
Connect your Stripe account and click Test Trigger. Use a real or test purchase for the AI Apprentice product. You need live purchase data to map fields in the steps ahead.
Add a Filter to Block Non-AI Apprentice Purchases
This step is critical if your Stripe account processes more than one product. Without it, every Stripe payment — regardless of what was purchased — will trigger the onboarding flow.
- Add Step → Filter by Zapier
- Condition:
Line Items → Price → ID(Text) Exactly matches your AI Apprentice Price ID
If you offer both a one-time payment and a subscription, add a second condition using OR logic with the second Price ID.
Always filter by Price ID — not by product name. Price IDs are permanent and unique. Product names can be edited, which would silently break your filter.
Split the Customer’s Full Name
Stripe sends billing name as a single field. Keap requires separate first and last name fields. Use Zapier’s Formatter to split them.
- Add Step → Formatter → Text → Split Text
- Input:
billing_details.nameorcustomer_name - Separator: a single space
- Extract “First” — then add a second Formatter step to extract “Last” (or use Zapier’s Utilities: Split Name for a one-step approach)
The outputs from this step feed directly into the Keap contact fields in the next step.
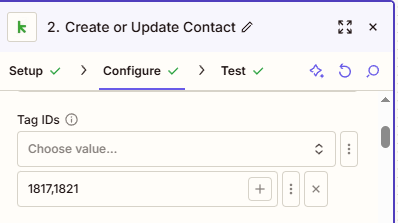
Create or Update the Contact in Keap
Use Keap’s Upsert Contact action. “Upsert” means it creates a new contact if none exists by that email, or updates the existing record if one is found. This prevents duplicates.
Map the fields as follows:
| Keap Field | Source |
|---|---|
| Duplicate Option | Email and Name |
| Given Name | Formatter: First Name output |
| Family Name | Formatter: Last Name output |
Stripe: customer_email | |
| Tag IDs | 1817, 1821 |
| Opt In | True |
The tag IDs 1817 and 1821 are what trigger the Keap campaign sequence. Once those tags are applied, the welcome email, credentials, and onboarding email series fire automatically — no separate “Add to Campaign” step is needed if your campaign uses a tag-based Goal.
Add Each Team Member to the New Project
For each team member, add a separate Add Person to Project step.
| Field | Value |
|---|---|
| Account | Your Basecamp account |
| Project | Output from the Create Project step |
| Person | Person ID from the corresponding Find Person step |
Turn On the Zap and Test End-to-End
Review every step in the Zap. Click the toggle at the top right to Turn On the Zap.
Run a real Stripe test payment for the AI Apprentice product and confirm:
- The contact appears in Keap with the correct tags
- The welcome email sequence fires
- A new Basecamp project is created with the customer’s name
See the Successful Outcome
When the automation is working correctly, here is what happens the moment a customer completes their purchase:
✅ Contact created or updated in Keap with AI Apprentice tags applied
✅ Welcome email + credentials sequence fires automatically from Keap
✅ New Basecamp project created with the apprentice’s name
✅ Team can start working with the new apprentice immediately — no manual steps required
This automation handles the technical onboarding steps. Your operations team should still follow the AI Apprentice Onboarding Checklist for the human-touch steps — Facebook group invite, Office Hours info, Academy access, Level 1 VA Guide, MAA introduction, and completion confirmation.
Customize This for Your Own Program
If you want to adapt this workflow for a different program or team, here are the variables to change:
- Team members: Replace the emails in the Find Person steps
- Keap tags: Update tag IDs to match your program’s tags in Keap
- Basecamp template: Select a different project template
- Additional team members: Duplicate the Find Person + Add Person steps for each extra person
This Zap is documented in the BlitzMetrics Task Library alongside other recurring workflows the team uses.
Verification Checklist
Use this to confirm the setup is complete before going live:
- Zap is named clearly (
Stripe → Keap — AI Apprentice Onboarding) - Stripe trigger tested with a real AI Apprentice purchase
- Filter is set to the correct AI Apprentice Price ID
- Formatter correctly splits first and last name
- Keap Upsert Contact step maps all fields including tags
1817and1821 - Keap welcome email sequence fires when tags are applied
- Basecamp project is created from the correct template
- Project name dynamically includes the customer’s first and last name
- All 3 team members (Dennis, Dylan, Muzamil) are added to the project
- Full end-to-end test run with a real purchase confirmed successful
- Screenshots added to each step in this guide
- Video walkthrough recorded and embedded above
- Zap is turned on (green toggle active)