Verifying your Google Business Profile (GBP) is crucial for visibility and customer trust. This guide covers the verification process, methods, and the importance of verification. For more techniques and troubleshooting tips, join our GBP course.
Why Verifying And Claiming Your Business Is Important
Verifying your business on Google enhances visibility, increasing your chances of appearing in local search results and the coveted local three-pack. It builds trust and credibility with potential customers, showing them your business is legitimate and well-maintained.
Step 1: Sign in to Google Business Profile
Go to www.google.com/business to sign in.
Step 2: Click Verify now
If you have multiple Google Business Profile accounts, make sure you choose the correct one.
Step 3: Choose a way to verify
Postcard by Mail is the default verification option. If your business is eligible for other methods, such as phone or email, choose the one you prefer. Fill in the required details.
Double-check to make sure you’ve entered it correctly, then submit the form.
It can take a few days to two weeks for the postcard to arrive.
When you receive your postcard, sign in and click Verify location from the menu. Enter the five-digit verification code from your postcard.
Note: It may take a few weeks for your business listing to appear on Google. While waiting, download the Google Business Profile app so you can manage your account.
Claim Your Business on Google
Do you need to claim an existing Google Business Profile? There are three options:
Option 1: Sign up or log in to your Google Business Profile. Search for your business, and select it. Then follow the steps to confirm that you are the owner.
Option 2: Look up the business listing in Google Search and click Own this business.
If someone has already claimed the business, and you work for the same company, ask them to add you as a user. If you don’t recognize the owner, follow the steps to reclaim your business.
Edit Your Business on Google
Do you need to edit information on your Google Business Profile? Here’s how:
Sign in to Google Business Profile.
Open the location you’d like to edit.
In the menu on the left, click Info.
Click the pencil icon to make your edits. If you want to remove a section, click the X. When you are finished, click Apply.
Keep in mind that it can take up to 60 days for the edit to appear. There may be some information from other sources that cannot be edited.
When I opened Dennis Yu’s speaker reel, my first reaction was straightforward: this was already a strong video. The pacing worked, the arc was clear, and the production quality felt polished. It didn’t need a rebuild.
What it did need was a small credibility lift — a few proof-driven moments that made Dennis’s authority clearer. Instead of rebuilding anything, I focused on replacing weaker visuals with real footage that supported the message already in place.
The Editing Approach I Used
As I watched, I looked for places where real proof could replace weaker visuals so the expertise in the reel becomes more visible.
I wasn’t chasing extra b-roll just to fill space. The goal was lightweight, context-matching authority inserts.
Doing this meant going back into Descript and editing the reel directly, which is exactly the kind of hands-on refinement that’s part of our Content Factory workflow. In this case, the video required small, context-matching authority inserts rather than big structural edits.
How I Selected the Clips (Blitzmetrics 30-Point Authority Rubric)
Who is saying it (10 points): Is Dennis clearly positioned as the expert?
Where is it being said (10 points): Is the platform or venue high-trust (major media, respected institution, credible event)?
What is being said (10 points): Is the message expertise-forward and specific (not generic hype)?
Only clips that scored strong across all three categories made the cut.
So I followed two simple placement rules:
Fill Low-Variety Sections With Real Proof
Where the visuals stayed the same for too long, I added short clips that brought both energy and credibility. That way, the reel stays engaging and the viewer keeps seeing Dennis in real authority contexts.
Replace Stock Moments When It Clearly Raised Authority
Where stock visuals were doing the job of “filler,” I replaced select moments with real footage that carried more credibility.
The High-Authority Clips I Added
1. Speaking at Loyola University Chicago (School of Communication)
What the Clip Shows: Dennis speaking on a Chicago business/digital webinar hosted through Loyola University Chicago’s School of Communication, seated on a panel alongside other professionals, with a live student audience present.
Why It Adds Authority: University setting + professional panel context adds institutional credibility, and the message is expertise-forward (urging students to help small businesses learn online promotional methods and tools).
2. On The Day (DW News) Covering Zuckerberg’s Congressional Hearings
What the Clip Shows: Dennis appearing on The Day (DW News) as a Facebook expert, commenting on Mark Zuckerberg’s congressional hearings.
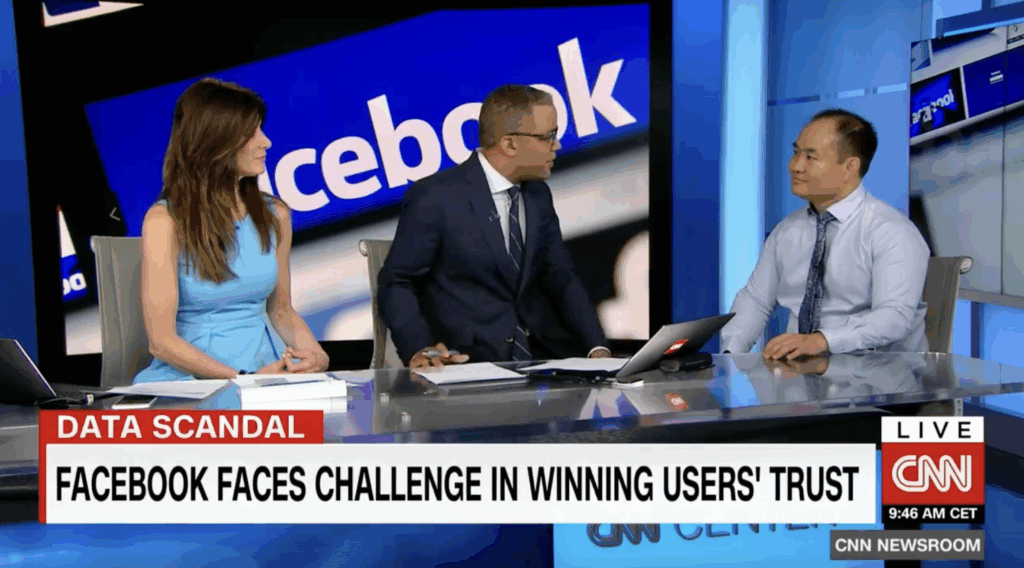
What the Clip Shows: Dennis on CNN discussing how Facebook faces a challenge in winning users’ trust.
Why It Adds Authority: Another top-tier news outlet reinforces that he’s sought out to explain Facebook and content-related issues at a professional level.
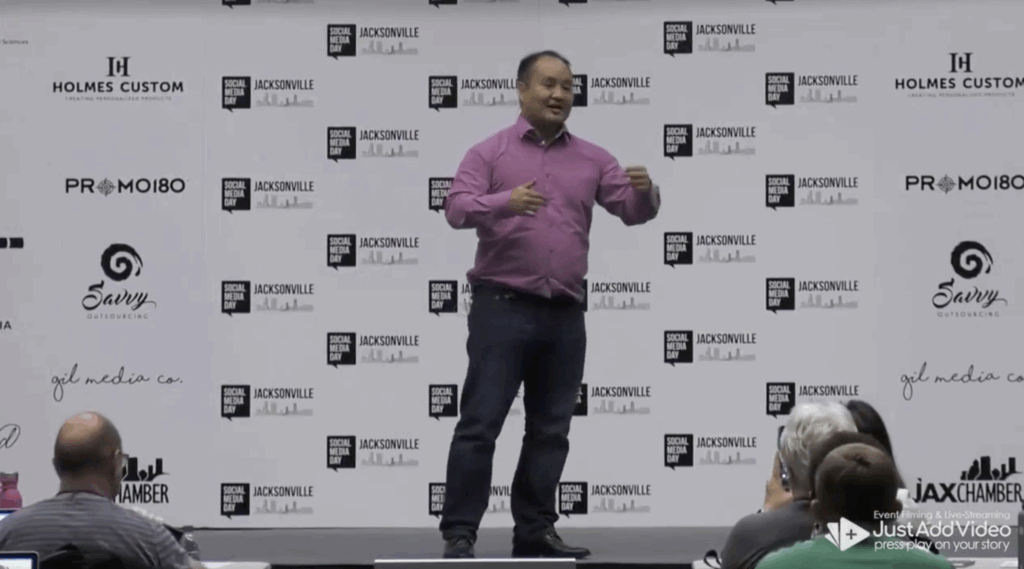
4. Speaking at Social Media Day in Jacksonville
What the Clip Shows: Dennis speaking at Social Media Day in Jacksonville in front of a large audience about digital marketing.
Why It Adds Authority: Stage authority + crowd size + event credibility signal he’s trusted to teach at scale because he’s an expert in the field.
5. Creating a Video with Jake Paul
What the Clip Shows: Dennis and Jake Paul speaking directly to the camera for a video.
Why It Adds Authority: Jake Paul’s high public visibility signals that Dennis operates within prominent creator and media circles, reinforcing his credibility in high-visibility digital environments.
6. With Dan Antonelli (Home Service Branding Conversation)
What the Clip Shows: Dennis sitting down with Dan Antonelli for a recorded conversation (YouTube/interview style).
Why It Adds Authority:Dan Antonelli is the founder and creative director of KickCharge Creative, a leading branding agency in the home services industry, and is widely recognized for helping contractors build strong, differentiated brands. Being positioned in a peer-level conversation with one of the most established names in home service branding reinforces Dennis’s authority as someone operating at the same professional tier.
7. Mentoring Jack Wendt (Mentorship / Coaching)
What the Clip Shows: Dennis coaching/mentoring Jack Wendt in a working session context.
Why It Adds Authority: Mentorship footage is “authority in action” — it positions Dennis as the teacher/operator guiding other builders. Jack Wendt is a successful AI Apprentice, and a founder of High Rise Influence, reinforcing that Dennis is training real operators, not hypothetical students.
8. Speaking with Marko Sipilä (HVACQuote.ai / CoatingLaunch)
What the Clip Shows: Dennis speaking with Marko Sipilä on video, explaining concepts and sharing insights.
Why It Adds Authority: Marko is a successful AI Apprentice mentored by Dennis, founder of HVACQuote.ai (helping home service contractors convert leads with instant quotes) and previously scaled CoatingLaunch into a powerhouse in the concrete coatings industry. Training a proven operator reinforces Dennis’s authority as someone successful entrepreneurs learn from.
Why It Adds Authority: This is industry-proof — Dennis is working with a recognized dentistry leader and practice owner, reinforcing “trusted by professionals with real businesses.”
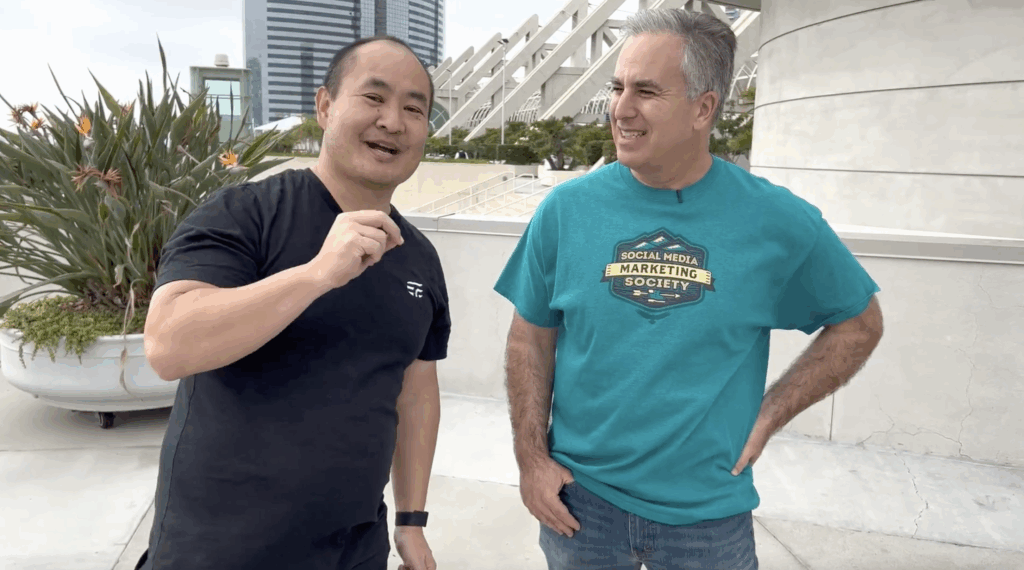
10. With Michael Stelzner (Industry Conversation)
What the Clip Shows: Dennis in conversation with Michael Stelzner.
Why It Adds Authority: Michael Stelzner is the founder of Social Media Examiner, so this adds strong peer/industry credibility and signals Dennis is connected to respected leaders in the social marketing space.
Why These Small Inserts Matter
Edits like these are small individually, but they raise the authority signal of the entire asset. These edits don’t change the story — they reinforce it with clearer visual proof. When the strongest moments are easier to see, every future reuse of the asset performs better.
The original reel already communicated Dennis’s message well. My edits didn’t change the story — they strengthened the evidence behind it.
By adding real-world authority footage in the right places, the reel gains:
Higher credibility density
Better pacing (fewer flat stretches)
Less “generic” feel where stock visuals used to carry the load
The structure stays the same; the evidence on screen is stronger.
What This Demonstrates
Small, precise upgrades like these make an already strong reel feel more grounded and more representative of Dennis’s real-world authority. The structure stays the same, but the presence feels sharper and more credible.
It’s a small edit, but it makes the final piece line up more clearly with how Dennis actually works and shows up in real life.
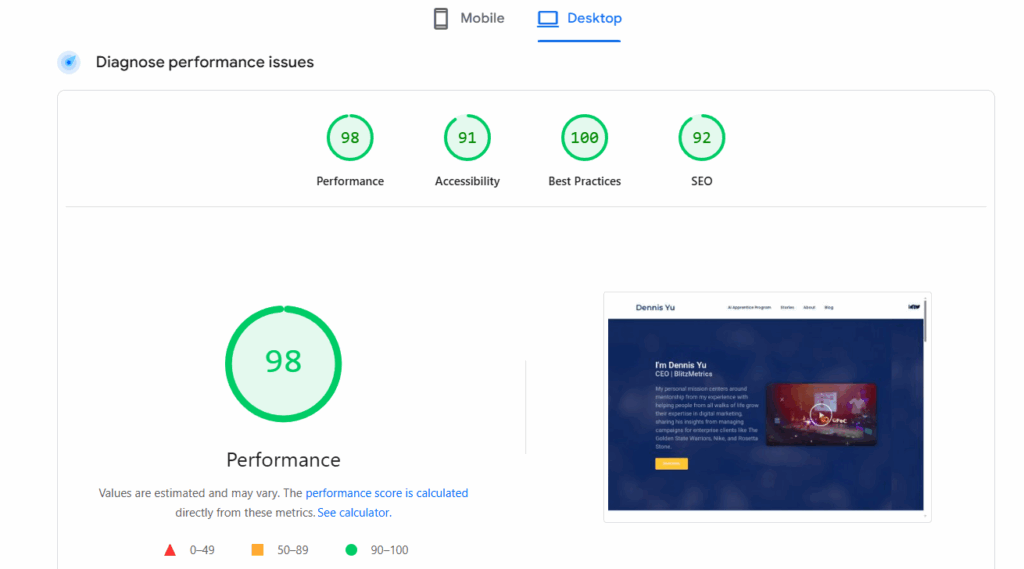
Most agencies treat page speed like a separate service. We don’t because slow sites quietly kill everything else.
Page speed optimization is part of our core troubleshooting and optimization process, not a random add-on or afterthought. If we’re working with you, we’re already paying attention to how fast (or slow) your site loads and what’s getting in the way.
You can publish great content, optimize your Google Business Profile, and run ads but if the site underneath is sluggish or unstable, performance suffers across the board.
If your domain is registered with Namecheap and you need to point it to another hosting provider, you’ll need to update your DNS nameservers. Don’t worry, it’s simple. Follow these steps to get it done quickly and correctly.
Why Change DNS Nameservers?
Changing your nameservers tells the internet where your website lives. It’s essential when:
Switching hosting providers – Your new host uses its own DNS system.
Improving performance – Some DNS services are faster or more reliable.
Enhancing security – Specialized DNS providers can protect against attacks.
In short, your nameservers control where your website and emails are directed. Setting them up correctly ensures your site loads properly for visitors.
Step 1 – Log In to Your Namecheap Account
Head over to Namecheap.com and sign in. You’ll land on your Dashboard, which lists your active domains.
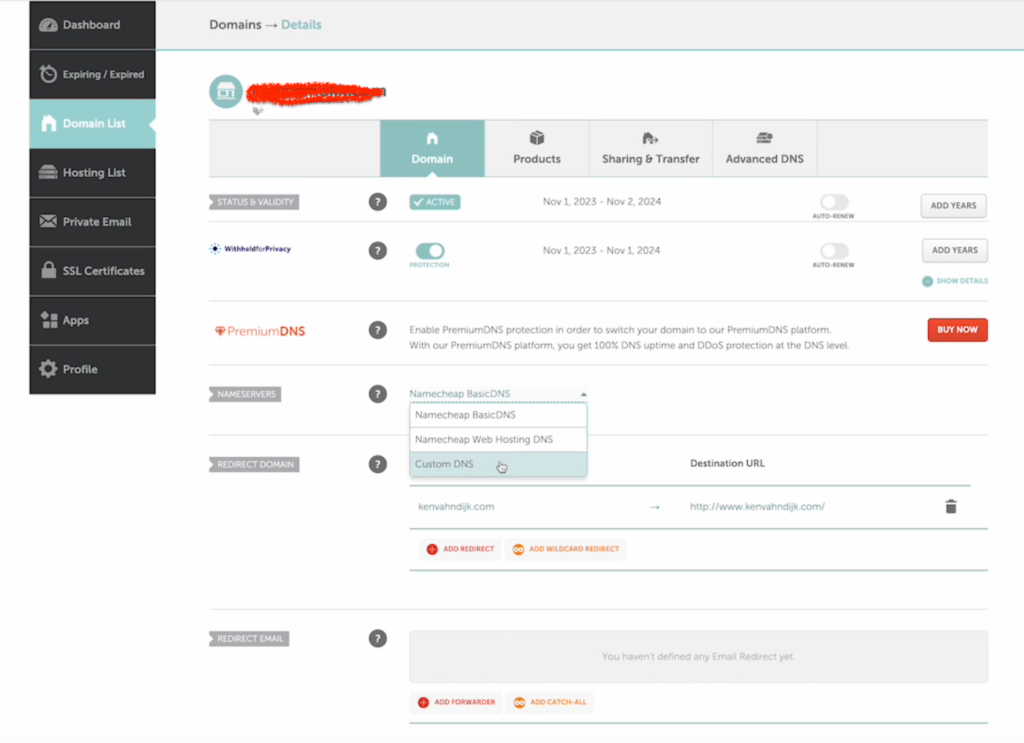
Step 2 – Access the Domain List
From the left-hand menu, click Domain List. This page displays all your domains under management.
Step 3 – Select the Domain
Find the domain you want to update and click Manage to open the domain details page.
Step 4 – Navigate to the Nameservers Section
Scroll until you find the Nameservers or DNS Management section.
Step 5 – Choose Custom DNS
From the dropdown, select Custom DNS (sometimes labeled Use Custom Nameservers). This allows you to manually enter your hosting provider’s DNS details.
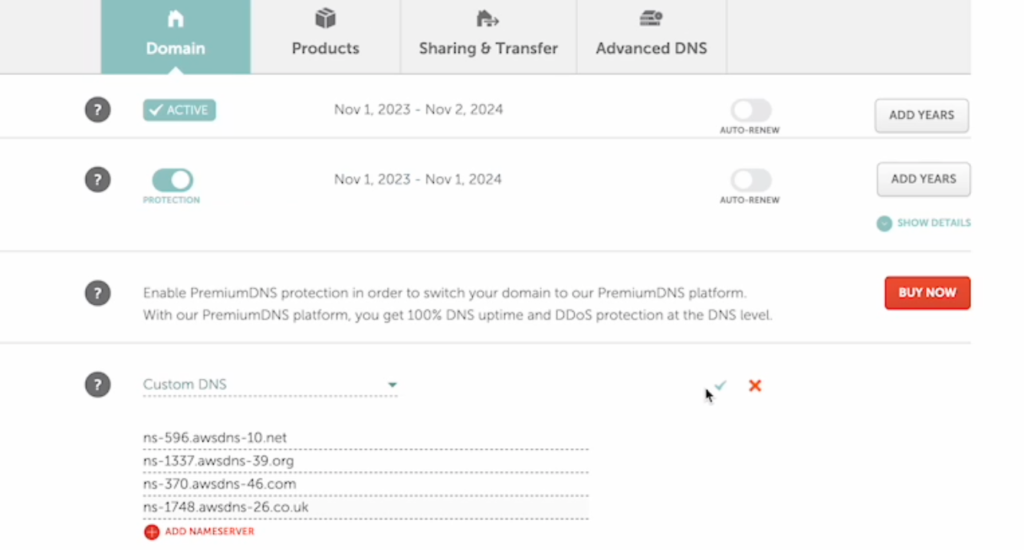
Step 6 – Enter New Nameservers
Enter the new nameservers provided by your host. You’ll typically have at least two:
Double-check them; typos here can take your website offline.
Step 7 – Save Changes
Click the green checkmark (✓) or Save button to confirm your updates.
Once saved, DNS propagation can take anywhere from a few minutes to 24 hours. During this time, some visitors may still see your old hosting server.
Conclusion
Changing your DNS nameservers in Namecheap is straightforward once you know where to look. Just be sure to enter the correct details and give the changes time to propagate.
Changing your domain’s nameservers lets you point your domain to a new hosting provider or DNS manager. This quick guide walks you through the exact steps inside GoDaddy.
Step-by-Step Instructions
1. Sign in to GoDaddy
Go to GoDaddy.com and log in. Navigate to My Products → Domains, then select the domain you want to modify. This opens your Domain Information screen.
2. Click the “DNS” Tab
Next to the Overview tab, click DNS to open your DNS management panel.
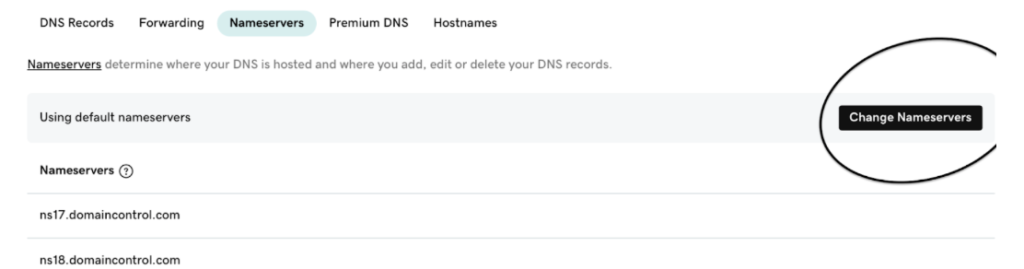
3. Open “Change Nameservers”
On the Manage DNS screen, scroll down until you see the Nameservers section. Click Change Nameservers.
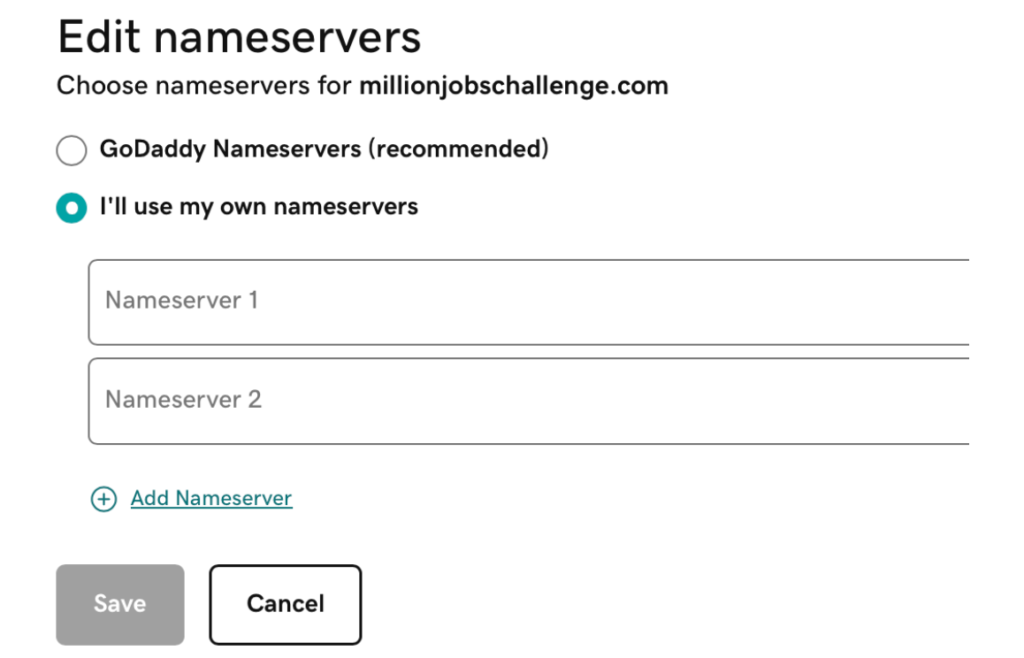
4. Choose “I’ll Use My Own Nameservers”
A dialog box will appear. Select I’ll use my own nameservers to manually enter your new DNS information.
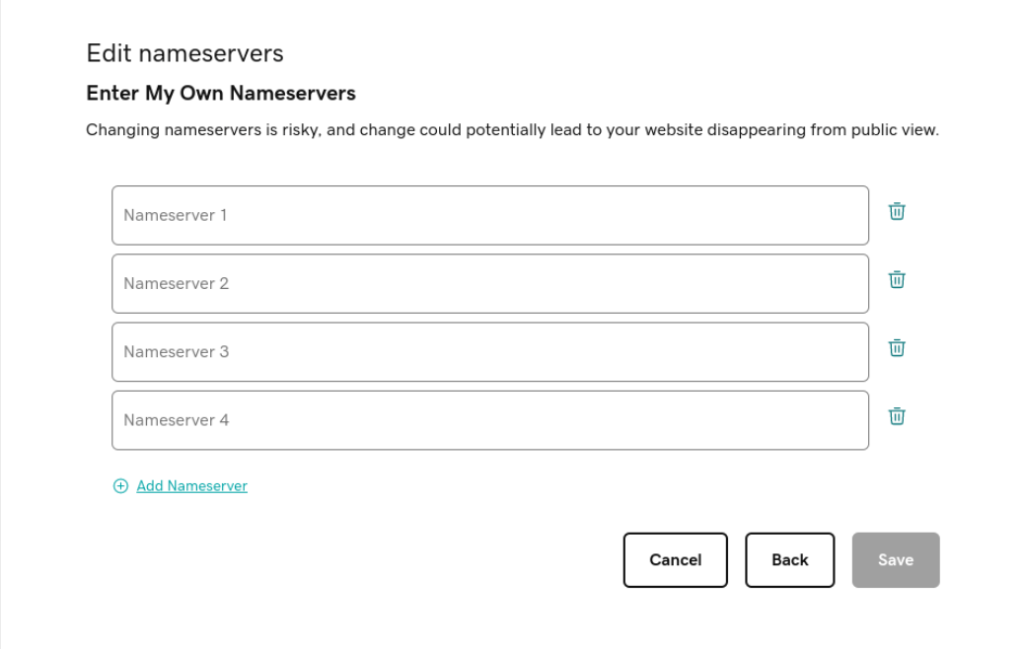
5. Enter Your Nameservers
Input the nameservers provided by your hosting provider or DNS manager. You may need to add two or more entries (for example, ns1.yourhost.com, ns2.yourhost.com, etc.).
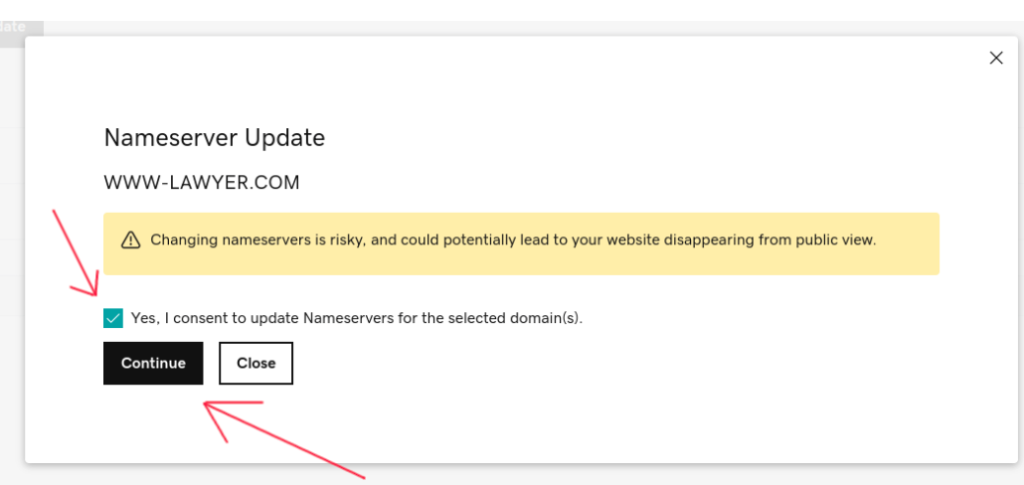
6. Save Your Changes
Click Save. If GoDaddy asks for confirmation, check the acknowledgment box and click Continue to apply the update.
What Happens Next
After saving, your domain will begin DNS propagation, which can take up to 24 hours worldwide. During this time, your site might appear temporarily unavailable until the changes fully take effect.
Tip: Double-check your nameservers for accuracy; incorrect entries can cause your site or email to stop working.
Final Thoughts
Changing nameservers is a simple task once you’ve done it a few times, but it’s critical to get right.
If you’re not comfortable handling DNS settings or need help connecting your website correctly, don’t hesitate to reach out for support.
Notice how we can’t tell who ate the donut. That’s called passive voice.
Being clear about who is doing what and when (the 3 components of a task) is critical for getting things done. Direct, clear and concise communication is essential in the professional world.
It’s imperative to ensure that your writing is as understandable to your readers as it is to you. Just because it makes sense to you doesn’t guarantee others will interpret it the same way. Most people never learn to write clearly.
How can you recognize passive voice? When people use passive voice, they omit the “doer.”
This is often subconscious, but the effect is the same—it becomes harder to figure out what’s happening and who is responsible. The result of using passive voice is a message with unclear action.
Importance of eliminating passive voice in professional environments
Remember, every task and action must have a clear owner. Compare “I moved this” with “This was moved,” or “Dennis and I are recording” versus “Recording is happening.”
It is a little tough to catch it all the time, but in a business setting, we must eliminate all usage of passive voice– especially when coordinating a project or speaking with a client. Every action must have a clear owner that comes first, and each project needs someone responsible for completing a task- adhering to the RACI (Responsible, Accountable, Consulted, Informed) model.
Thinking in passive voice significantly reduces your effectiveness and accountability. It’s more serious than mixing up “your” with “you’re” or using “ums” in speech. Passive voice strips actions of ownership, making it difficult to trace who did what, hence leading to confusion.
Here are a few real-world examples we’ve picked from emails, with corrections:
1. “Call has already been booked.” vs. “I booked the call, it’s Thursday at 10.”
Who booked the call? I booked the call.
2. “This email is to confirm that this account is at inbox zero.” vs. “This is Bob confirming that this account is at inbox zero.”
Who sent this email? Bob sent the email.
3. “More updates to come as these get closed out.” vs. “I will provide more updates as these get closed out.”
Who should we expect updates from? I will send them.
4. “This thread was moved here” vs. “I moved the thread to here.”
Who moved the thread? I did.
This is less about being picky with grammatical rules and more about being action-oriented.
Passive voice often comes from a mindset of unaccountability, where it’s someone else’s fault, and we don’t step up as owners of our actions.
Do you now see how using direct language ensures everyone is on the same page?
We all want things done quickly. But in our workflow, repeated follow-ups do not speed things up. In fact, they slow everything down.
The reality
I get over 1,000 emails per day. When you follow-up, which is not necessary with us, you actually slow things down.
The reason why is that we process via first-come, first-served via Boomerang. So when you follow-up, you become the latest request.
Think of it like standing in line at the DMV; if you keep stepping out of line to “check in,” you’re not getting called sooner. You’re starting over.
Why this matters
Following up without reading prior instructions means:
The same explanation gets repeated.
We waste time fixing things that could have been correct the first time.
The burden shifts from solving your request to rescuing it from repeated mistakes.
When you skip steps or ignore the process, you’re effectively saying:
“My time is more valuable than everyone else’s, so I can skip the line.”
That’s not how we work here.
The root cause? Often, it’s about not understanding what a process or system actually is, and how to work within one. This is why we’ve written extensively on:
If you understand these principles, you won’t need to follow up unnecessarily because you’ll know how to get things right the first time.
The correct way to get things done
Read the instructions fully, even the parts you think you already know.
Follow the documented process exactly.
Send it once; with all required details and correct formatting.
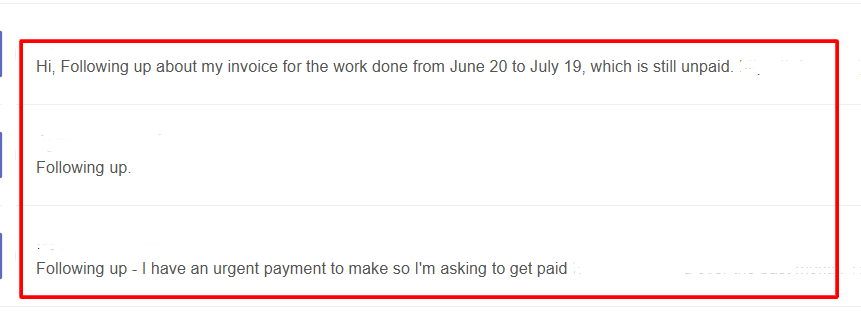
A VA not following instructions and repeating the same mistakes
A simple test before you hit “send”
Have I re-read last message and followed everything in it?
Have I checked for typos, missing names, or skipped steps?
Am I sending this only once, with everything needed?
If you can answer “yes” to all three, send it. If not, fix it first.
Following up multiple times may feel proactive to you. But here, it’s like repeatedly pressing the elevator button, it doesn’t make it come faster. It just makes the ride bumpier for everyone.
Let’s keep things moving smoothly by doing it right the first time.
That you shouldn’t reply all unless it’s actually valuable to everyone. The more people you’re replying to, the more careful you should be.
Jensen Huang, founder of Nvidia — one of the world’s most valuable companies — has a saying:
“If you send it, I will read it.”
We operate the same way. But we only want to read things that help push the ball forward.
If you’ve ever opened your inbox to find a 25-message thread you didn’t need to be on, you already know: the “Reply All” button can be dangerous.
But it’s more than just a minor annoyance– it’s often a symptom of a deeper issue: a team that lacks clarity around roles.
Specifically, who’s Responsible, Accountable, Consulted, or Informed— in other words, a team without clear RACIalignment.
As someone managing over 1,000 emails per day, I spend a huge chunk of my time filtering: What needs my input? What can be delegated? What should just be deleted? All of this wastes valuable time I could be using to build cool things.
Let’s break down what’s really happening here — and how to fix it.
When Reply-All Becomes a Crutch
A new team member recently CC’d the entire company to ask for login info to a specific tool — something only our Ops lead could’ve answered.
Well-intentioned? Sure. Productive? Not at all.
So why do people hit “Reply All” when they don’t need to?
Often, it’s driven by fear or insecurity:
“I want people to know I saw this.”
“What if they think I’m slacking?”
“Better to say something than be silent…”
But in reality, this behavior slows down decision-making, clutters inboxes, and creates a false sense of momentum.
Here’s the kicker: most people don’t realize they’re doing it. They mistake visibility for value.
A RACI Refresher (and Why It Matters)
When roles aren’t clear, everyone feels the need to say something — or worse, no one acts at all. That’s where RACI brings clarity:
Responsible: The person doing the work.
Accountable: The one who signs off.
Consulted: People whose input is needed.
Informed: People who should be kept in the loop.
“Reply All” spirals usually happen when everyone starts acting like they’re Consulted — even if they’re just Informed. Or worse, when no one knows who’s truly Responsible.
For example, imagine we need to launch a Facebook Dollar-a-day ad campaign for a client. The team member who’s responsible (R in RACI) should be the one launching it and letting the accountable person know.
But when the accountable team-member isn’t accountable, we have situations where it’s a free-for-all at best, and nothing gets completed at worst.
What It Should Look Like
Let’s say someone sends an update about a project delay.
Here’s how a functional RACI team handles it:
The Accountable person makes sure timelines adjust.
The Responsible replies (in-thread or privately) with next steps.
The Consulted offer insights only if asked.
The Informed? They stay silent — and stay informed.
What happens instead?
A flurry of “Thanks!” “Got it!” “Let me know if I can help!” — well-meaning noise that adds zero value.
Think of it like a school project where in a group of 5, two people do all the work while the other three look busy in front of the teacher. Meanwhile, they’re unintentionally slowing down the productivity of the two classmates.
How to Break the Reply-All Habit
Reply-alls and private messages are a tell-tale sign that someone isn’t used to working in a team. It isn’t just a communication problem — it’s a competency problem from us not following RACI etiquette.
Here’s how to fix it:
Set communication norms. If you’re Informed, don’t feel pressure to chime in. Silence is not neglect — it’s discipline.
Make RACI roles explicit. Before any task or project kickoff, define who fits where.
Pause before replying. Ask: Does this move the task forward?Does everyone need to see this?
Use better tools. Slack channels, project boards, or dashboards are better for FYIs than a sprawling email thread.
While overusing “reply all” clogs inboxes and creates noise, the opposite behavior – messaging only Dennis – is often a bigger mistake.
It bypasses the team, creates bottlenecks, and forces Dennis to manually loop others back in. This breaks the system of team accountability and visibility.
Reply-all is just a symptom. The real issue? A team that lacks competency, structure, and trust.
One of our worst reply-all threads last year involved seven people, two time zones, and three missed deadlines — all because no one knew who owned the task. That mistake cost us a client meeting and a lot of internal friction.
If we want to work with A-Players, we have to communicate like them. That means trusting each other, staying in our lanes, and speaking only when it actually helps.
You don’t need to be loud to be effective. Silence isn’t passive — it’s elite communication, provided you don’t need to be involved.
You just need to be clear and reliable– which is what actually moves projects along.
This page is free training for local service business owners who want to understand how marketing actually works before delegating it to an agency or investing further.
Most businesses don’t struggle because they aren’t trying hard enough. They struggle because the systems behind search, social, ads, and content aren’t explained in a way that connects actions to real business outcomes.
Each resource below focuses on a specific area where confusion is common—how platforms interpret your business, why content often fails to perform, and how to evaluate what is (and isn’t) producing revenue.
You don’t need to watch everything. Start with the section that best matches where you feel uncertain, and use the rest as reference as questions come up.
Below is a curated collection of videos selected because they address the most common points of confusion and failure.
How SEO actually works
Start here. This video explains the underlying framework the rest of these trainings build on.
This is the first episode in my Marketing Mechanic series, which focuses on identifying the underlying mechanism that actually drives performance in a marketing channel.
SEO continues to be a frustrating mystery for home service businesses.
Much of that confusion comes from focusing on tactics instead of understanding how search engines interpret businesses at a structural level.
As a search engineer who helped build Yahoo! over 25 years ago, I explain how search engines, social platforms, and tools like ChatGPT interpret entities, and why this matters far more than traditional SEO checklists.
This episode establishes a foundation you’ll see repeated throughout the rest of the trainings: once you understand the mechanic, decisions become simpler and more controllable.
The first seven Marketing Mechanic episodes are designed to build on each other, moving from foundation to execution.
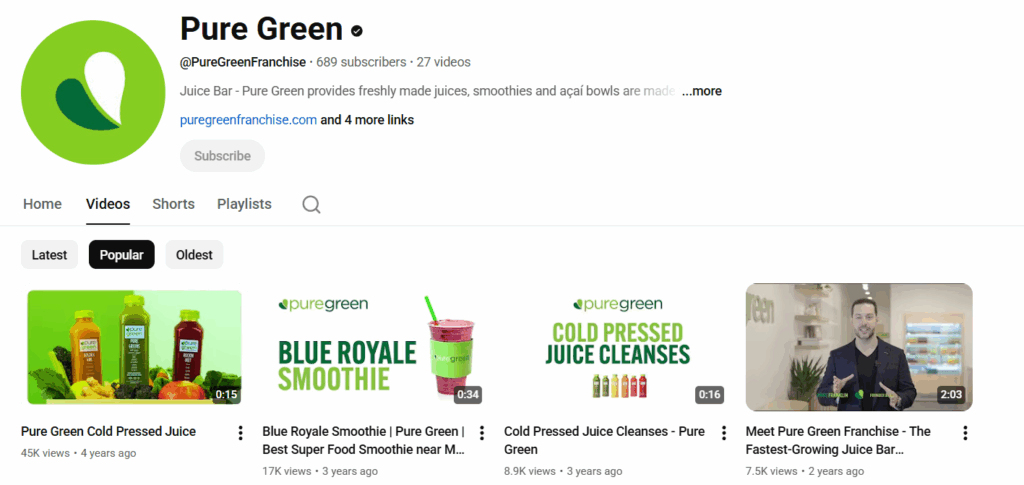
Content strategy that drives sales
Most home service businesses fail spectacularly at content marketing because they pursue a content calendar approach instead of the evergreen Topic Wheel.
In this video, we cover how to go from random posts that get no engagement and die out to revenue-producing assets that continue to live forever.
We’ll discover the 90/90 rule, 3×3 grid, and Greatest Hits, which you can implement immediately.
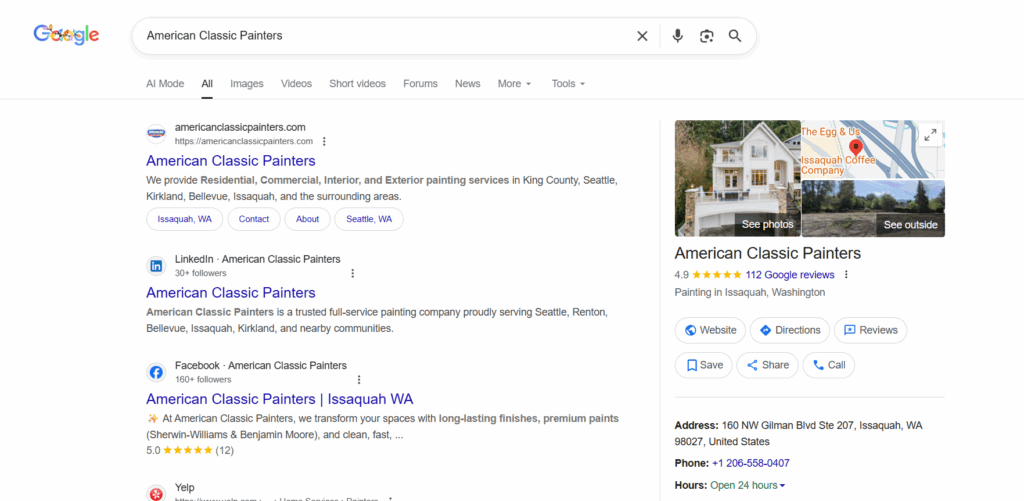
Own your name on Google
If you don’t own your name on Google, you don’t own your business.
Type your name into search right now. Do you see you… or do you see LinkedIn’s rented billboard?
That’s like running a million-dollar company but letting someone else hold the keys to your front door.
In this video, I break down exactly how to take back your name, structure your personal brand site, and trigger Google’s Knowledge Panel so you become the undisputed authority on you.
If Google can’t tell who you are, neither can AI. And that means customers can’t either.
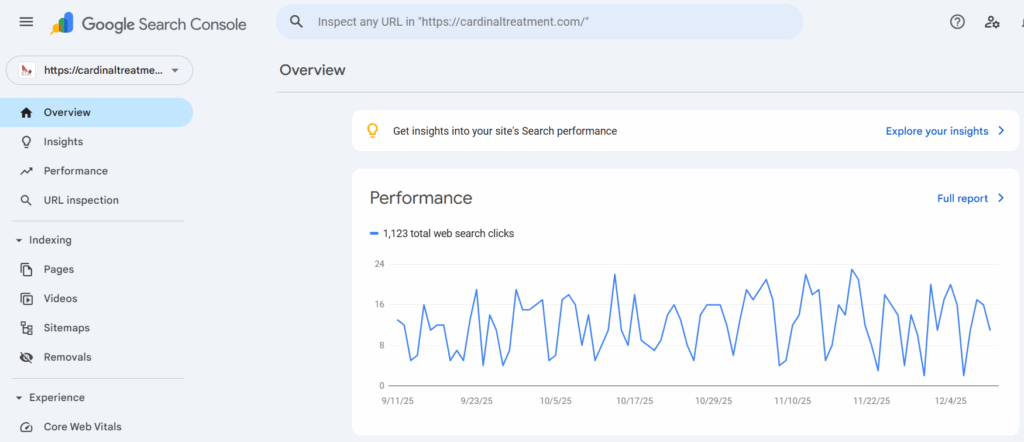
5 steps to own your own marketing
Whether you use an agency or do it in-house, you should always OWN your own marketing.
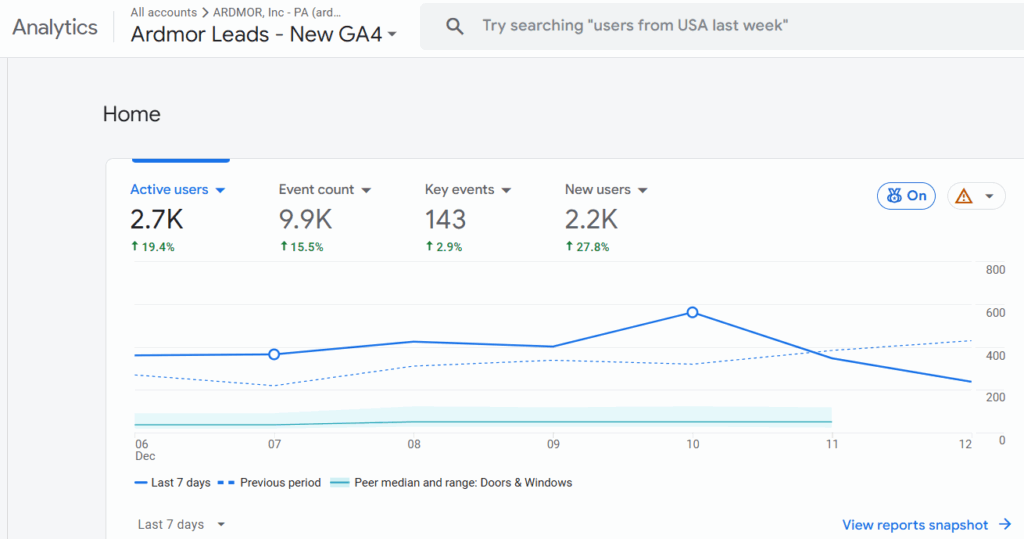
Not just to verify you have ownership across all your assets, but to also understand what’s actually driving revenue and where calls are coming from.
Even if you’re not “technical”, you as the business owner deserve to know from your service providers how much money is incrementally being generated by each tactic, without having to ask.
And you should be able to see the actual numbers in your own systems, not a 3rd party interface dressed up to make them look good.
Here are 5 steps to take back control.
There are thousands of legitimate marketers out there who aren’t afraid of letting the client own their own systems and to show them the data.
+ Get access to all your assets (web, social, email).
+ Look at the spend and change history in ad accounts.
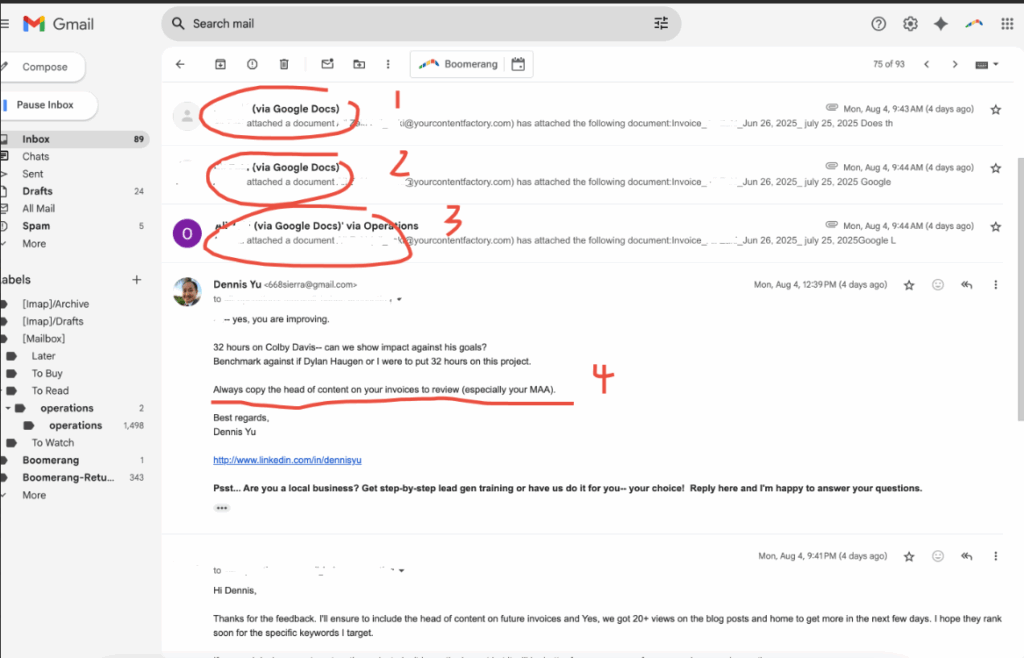
Clients can be unhappy with our results, even though we’re working hard.
Each of us is doing what appears to be good work, but must understand MAA (business impact) to truly deliver.
Content creation and website tweaking is only half of the equation (conversion), while the other half is traffic (getting people to these pages).
The combination of traffic x conversion = qualified customers.
And that’s what we should all be looking at, no matter what part of the puzzle we’re working on– Google ads, tweaking the new veneer landing page, building links, editing videos, posting on YouTube, answering the phone, etc…
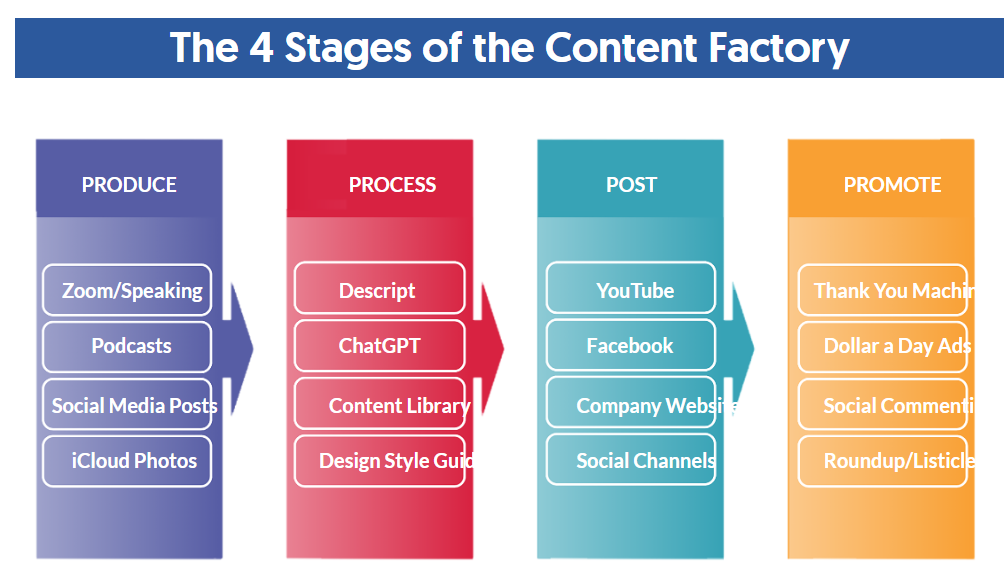
The Social Amplification Engine
Most people post randomly and hope something works. The Social Amplification Engine turns that chaos into a precise, repeatable system.
This guide walks you through the full stack of digital marketing (plumbing, goals, content, targeting, amplification, and optimization) and shows how each layer works together to generate consistent leads.
You’ll see how to build the infrastructure, set measurable objectives, create content that actually performs, target the right audiences, and measure what’s driving real revenue instead of chasing vanity metrics.
This is the original framework we’ve used for years with seven- and eight-figure local service companies.
How to build a Content Library
The articles I’ve written, social posts I’ve made, speaking, marketing materials have been scattered all over the place.
I’ve figured out an effective process to centralize it– which has helped me trigger a Google knowledge panel and help my companies grow.
Give this training to your marketing person to build and organize your Content Library.
For your company and your personal brand– to drive your content strategy, advertising, podcast, and other content efforts.
Want to accelerate? Join the AI Apprentice program
The free trainings above are designed to help you understand how modern marketing systems work and how to evaluate what’s driving real business outcomes.
Some business owners, however, want to apply these ideas inside their own businesses by developing a capable young adult who can execute, learn quickly, and grow with the company.
That’s why the AI Apprentice Program exists—a structured, year-long group coaching program led by me and a hand-picked expert team, focused on implementation, skill-building, and accountability.
What you get:
Hands-on work applied directly inside your business
Weekly live coaching every Thursday at 2pm PST.
Private Facebook group for daily support.
Full OpenAI Teams access (we pay for it).
API credits + tools we’ve built and licensed.
A structured path to mastery.
Accountability to ensure you execute.
This allows your marketing to be handled internally, rather than outsourced to an agency you can’t see into, and instead carried out by a trusted young adult inside your business. You know what’s being done, why it’s being done, and how it connects to real business results.
Investment:
$7,500 for a full year (Yes, people charge more for a weekend workshop.)
This is the same system that helps young adults do in 3 months what normally takes 3 years trying to learn alone.